Your First Autonomous Agent Mesh – Easier Than You Think
In this guide we’ll build a Decentralized, Autonomous Vacation Booking System in Python using the Protolink library.
The landscape of AI agents is shifting. We are moving away from monolithic scripts driven by a single giant model, towards Multi-Agent Systems (MAS) where specialized, autonomous agents collaborate to solve complex problems.
But today’s frameworks often trap you in a walled garden:
- Locked into a specific LLM (OpenAI, Anthropic, etc.)
- Locked into a specific Transport for communication.
- Locked into a specific runtime (only runs in Python, or only in a specific cloud)
- Locked into specific Tooling schemes.
Agents are just functions, not independent entities.
Protolink breaks away from this model & addresses these limitations directly.
In Protolink, an Agent is an autonomous, centralized object that serves as the core unit of your system. It is designed to be fully modular, so you can plug in any LLM, Tools, Transport, Storage, OpenTelemetry and Authentication stack you need.
Care only about the logic. Leave the communication, agent lifecycle, inference and tooling, authentication, memory and logging to Protolink.
Protolink is based on Google’s Agent-to-Agent (A2A) Protocol. Unlike the base A2A specifications, Protolink enables more open and flexible communication: agents can call another agent’s LLM for reasoning, invoke its Tools directly or let the users define their own communication scheme. This allows for a flexible mesh where specialized agents can leverage each other’s native capabilities without rigid orchestration bottlenecks.
In this post, we’ll build a 🏖️ Vacation Booking System where four distinct agents collaborate to plan and book a trip to Greece, running entirely on your local machine or distributed across the cloud.
The code provided below will be 100% runnable. The link to the github file for each script will also be provided.
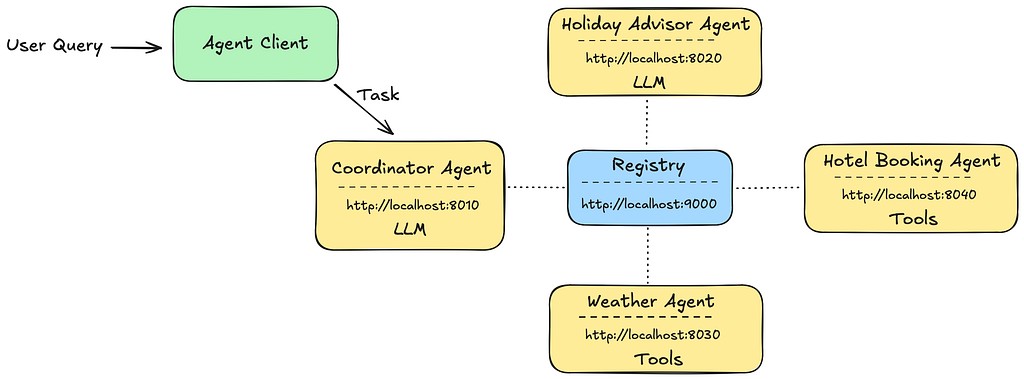
The Architecture: A Mesh of Specialists
We will build a team of four agents. Note that they don’t just “call” each other as functions; they communicate over HTTP using protolink’s standard agent_call protocol.
1. Coordinator Agent (LLM + Tools): The user-facing orchestrator. It breaks down the user’s request and decides wether to delegate tasks to other agents.
2. Holiday Advisor (LLM): A pure reasoning agent. It uses an LLM to evaluate destinations.
3. Weather Agent (Tools): A deterministic agent that provides weather forecasts.
4. Hotel Agent (Tools): A deterministic agent that executes bookings.
5. Registry: The Registry is where the agents are registered so they can be discovered and discover other agents. In our example we’ll use an HTTP Transport for the Agent-to-Registry as well.
Let’s install the library first (using pip or uv) and python version ≥ 3.11.
pip install protolink
Instructions:
Note 1:
If you run the following code all in one file keep the code as is and just copy-paste it. Just make sure to include the code in an asynchronous method (async def) since the await doesn’t work in .
import asyncio
from dotenv import load_dotenv

load_dotenv(".env")

async def main():
  <PUT CODE HERE>
  ...

if __name__ == "__main__":
  asyncio.run(main())
If you want to run each agent in a separate python script, please use the .start(blocking=True) argument. This blocks the runtime and keeps the agent running even if the script ends. In case you run it in a jupyter notebook this is not needed.
Note 2:
Please either set an .env file in the folder where the script(s) is contained, setting the variables for the LLM API key you’re going to use.
OPENAI_API_KEY=
ANTHROPIC_API_KEY=
GEMINI_API_KEY=
HF_API_TOKEN=
OLLAMA_URL=
OLLAMA_MODEL=
You can also set it in the constructor of the LLM e.g.
from protolink.llms.api import AnthropicLLM

llm = AnthropicLLM(api_key="<YOUR_API_KEY>")
in the example I’ll use llm = OpenAILLM(model=”gpt-4o”), feel free to replace it with the LLM of your choice, currently supported by Protolink.
protolink.llms.api: OpenAILLM, AnthropicLLM, GeminiLLM, DeepSeekLLM, GrokLLM
protolink.llms.server: OllamaLLM
protolink.llms.local: TBD
You can also make your own LLM wrapper class, really easily, by just implementing the call and call_stream functions. The LLM base class can be found here protolink/llms/base.py.
Let’s start the coding
The complete code you’re about to see, can be found in this file. It includes every piece of code from this guide, in one python script. In the project example folder, you may find all scripts as standalone, along with helper scripts.
Before starting implementing our agents, let’s start the Registry so the Agents can discover their network.
from protolink.discovery import Registry

registry = Registry(transport="http", url="http://localhost:9000")

# Start the Registry simply by using .start()
await registry.start()
That’s it!
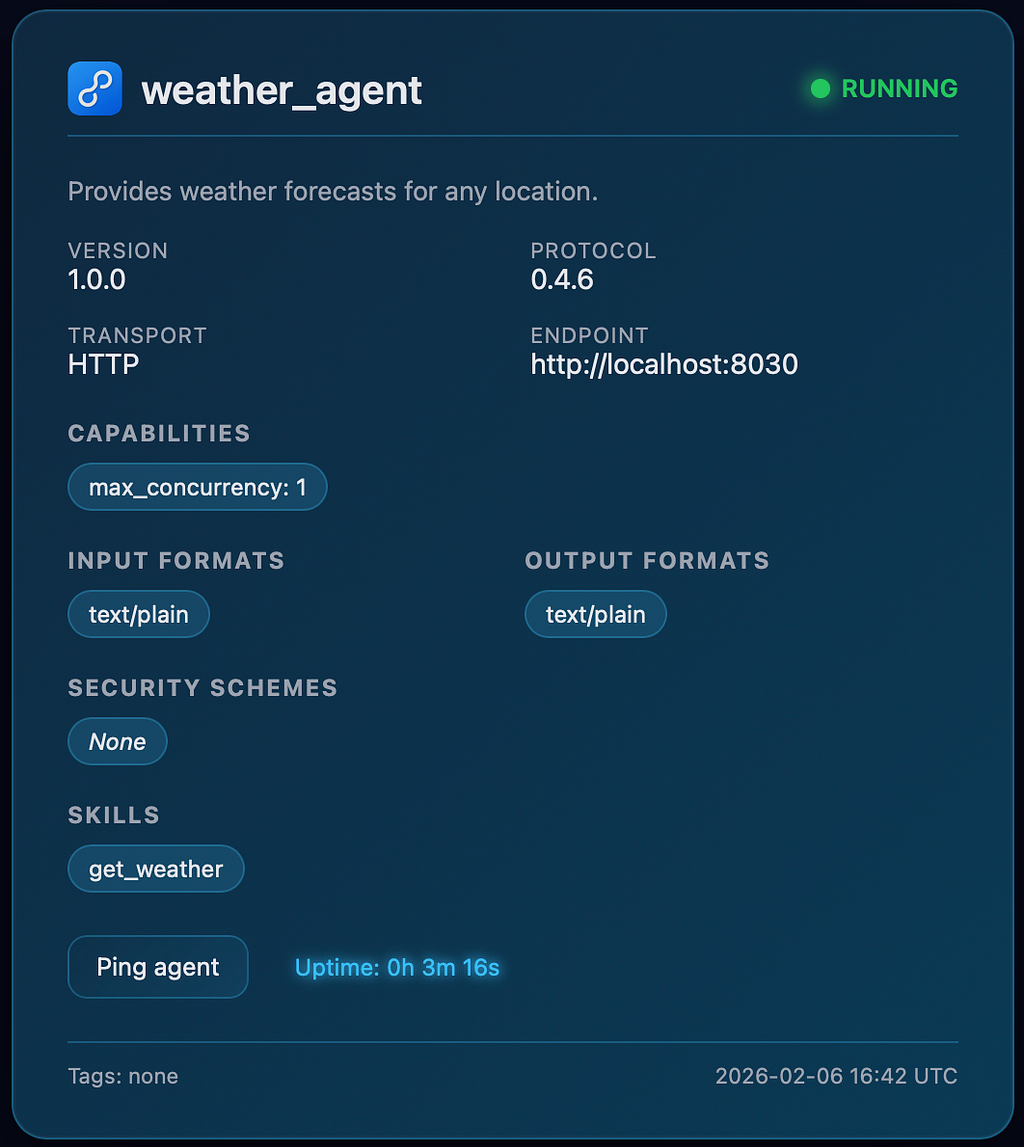
💡 When starting an Agent or the Registry using the HTTP Transport, a card written in HTTP/CSS/JS is automatically exposed in the /status URI. So by starting the registry you can access in the browser at http://localhost:9000/status the card to see the overall status. See the following image.

This is a built-in functionality provided by protolink for monitoring.
Let’s see a high-level architecture before continuing. All the agents communicate with the Registry in order to register themselves and get information about other agents in the network. Each Agent exposes its Agent Card, which contains info about it.
Now let’s see a flowchart with the agent’s behavior in order to understand how the system works.

It’s important to note that what the flowchart shows is how the agents are expected to act in our example. Since in Protolink, the Agents are autonomous entities, an agent might decide to act differently (e.g. the coordinator agent doesn't call the weather agent) and this is the beauty of A2A, multiple Agents that collaborate to solve a Task autonomously, while also you as the programmer has the power to be as invasive as you want in the agent flow.
- The Holiday Advisor: Pure Reasoning (LLM-Agnostic)
This agent’s job is to think. It doesn’t need external tools. Protolink provides all necessary adapters behind the scenes to ensure that whichever provider and model you choose (OpenAI API, Anthropic API, Gemini, Ollama, etc.) strictly complies with the system’s inference cycle and tool calling protocols.
The system prompt we provide to the Agent and ultimately to its LLM needs to only define the role and logic-specific instructions. Agent & tool calling is handled by Protolink automatically, through predefined prompts that are loaded automatically. Also the reasoning logic and inference loop are also built-in.
from protolink.agents import Agent
from protolink.llms.api import OpenAILLM

# pass the key directly as an argument or leave empty to use environment variables
llm = OpenAILLM(model="gpt-4o")

# The following prompt will be added to the existing predefined system prompt given by Protolink.
ADVISOR_SYSTEM_PROMPT = """You are a Greek islands vacation expert. Your job is to evaluate
vacation destinations and provide recommendations.

When asked about a destination, consider:
1. Is this a good choice for the given dates?
2. Is the budget realistic for this destination?
3. Is it suitable for the number of travelers?
4. What are the highlights and potential concerns?

RESPONSE FORMAT:
Always provide a structured response with:
- verdict: "recommended" or "not_recommended" or "consider_alternatives"
- destination: the evaluated location
- reasoning: 2-3 sentences explaining your verdict
- highlights: list of 2-3 things that make this destination great
- tips: 1-2 practical travel tips
- alternative: if not recommended, suggest ONE better option with a brief reason

Keep responses concise and helpful. You are the expert - be confident in your advice.
"""

agent_card = {
  "name": "holiday_advisor",
  "description": "Expert travel consultant who recommends destinations",
  "url": "http://localhost:8020",
}

agent = Agent(
  card=agent_card,
  transport="http",
  llm=llm,
  registry="http",
  registry_url="http://localhost:9000",
  system_prompt=ADVISOR_SYSTEM_PROMPT,
  verbosity=2,
)

await agent.start()
Just with `agent.start()` the holiday advisor agent is now running and ready to receive requests. Since the transport is set to “http”, the agent will be available at `http://localhost:8020`. The agent’s address is defined in its Agent Card in the url field.
- The agent is Transport-Agnostic. If you want to use a different transport, you can set it to “websocket” or “grpc” and that’s it.
- The agent is LLM-Agnostic. If you want to use a different LLM, you can just write e.g. llm = AnthropicLLM(model=”claude-3.5-sonnet-20240620") and that’s it.
- The agent can integrate tools from other sources and make them native using adapters e.g. protolink.tools.adapters.MCPToolAdapter
- In case tools are provided, the LLM knows automatically how to call them, since they’re handled by Protolink’s tool integration and pre-defined prompts that guide the LLM on how to perform tools calls.
- We’re setting verbosity to 2 which means the debug messages will also be shown, in order to see the Tasks received and sent for each agent.
Important Note: Instructions on how to find and call other agents, agent tools or its native tools are not needed, as predefined prompts are provided by default by protolink. You just define in the prompt the LLM logic or role.
2. The Weather Agent: Deterministic Tools
Some agents don’t need an LLM. They are reliable workers. The Weather Agent exposes a `get_weather` tool. Protolink makes it easy to turn any Python function into a discoverable tool.
from protolink.agents import Agent
from datetime import datetime

agent_card={
  "name": "weather_agent",
  "description": "Weather forecast provider",
  "url": "http://localhost:8030",
}

agent = Agent(
  card=agent_card,
  transport="http",
  registry="http",
  registry_url="http://localhost:9000",
  verbosity=2,
)

# Adding a tool to the agent using the tool decorator
@agent.tool(
  name="get_weather",
  description="Get current weather forecast for a Greek island",
  input_schema={"location": str, "travel_date": str}
)
def get_weather(location: str, travel_date: str) -> dict:
  # Connects to real APIs, databases, or static data.
  # Now just provides dummy data
  result = {
    "location": location,
    "date": travel_date or "Summer season",
    "temperature_celsius": 32,
    "condition": "Sunny",
    "humidity_percent": 50,
    "wind": "moderate",
    "suitable_for_vacation": True,
    "recommendation": "Perfect weather for a beach vacation!",
    "timestamp": datetime.now().isoformat(),
  }
  return result

await agent.start()
here’s the status card for the Weather Agent that can be found in http://localhost:8030/status. The skills tab shows all the Agent’s Tools.
3. The Hotel Agent: State & Action
The Hotel Agent defines a `book_hotel` tool. In a real system, this would interact with a booking engine (Amadeus, Sabre) or a database.
agent = Agent(
  card={
      "name": "hotel_agent",
      "description": "Searches and books hotel accommodations.",
      "url": "http://localhost:8040",
  },
  transport="http",
  registry="http",
  registry_url="http://localhost:9000",
  verbosity=2,
)

@agent.tool(
    name="book_hotel",
    description="Book a hotel for a vacation. Returns booking confirmation with details.",
    input_schema={
        "location": str,
        "check_in": str,
        "check_out": str,
        "guests": int,
        "budget": str,  # "budget", "mid-range", or "luxury"
    },
)
def book_hotel(
    location: str,
    check_in: str,
    check_out: str,
    guests: int = 2,
    budget: str = "mid-range",
) -> dict:
    try:
        check_in_date = date.fromisoformat(check_in)
        check_out_date = date.fromisoformat(check_out)
        nights = (check_out_date - check_in_date).days
    except ValueError:
        nights = 3  # Default

    total_price = 280 * nights

    # Execute transaction
    booking_id = {
        "status": "confirmed",
        "booking_id": "HTL-DAS98DA8D79D2JD9",
        "hotel": {
            "name": "Aegean Sunset Suites",
            "stars": 4,
            "location": location.title(),
            "amenities": ["pool", "spa", "breakfast", "sea view"],
        },
        "reservation": {
            "check_in": check_in,
            "check_out": check_out,
            "nights": nights,
            "guests": guests,
            "room_type": "Double Room" if guests <= 2 else "Family Suite",
        },
        "pricing": {
            "price_per_night": 280,
            "total_price": total_price,
            "currency": "EUR",
        },
        "policies": {
            "check_in_time": "15:00",
            "check_out_time": "11:00",
            "cancellation": "Free cancellation until 24h before check-in",
        },
    }

    return {"status": "confirmed", "booking_id": booking_id}

await agent.start()
4. The Coordinator: Orchestration & A2A
The Coordinator is where the magic happens. It uses an LLM to orchestrate the others. Crucially, it doesn’t “know” the other agents hard-coded. It discovers them via the Registry and uses the standard `agent_call` capability.
The Coordinator’s system prompt instructs it:
from protolink.llms.api import OpenAILLM

llm = OpenAILLM(model="gpt-4o")

agent_card={
    "name": "coordinator",
    "description": "Vacation booking coordinator that orchestrates specialist agents",
    "url": "http://localhost:8010",
}

# prompt the User can define in order to give a Role to the Agent
COORDINATOR_SYSTEM_PROMPT = """You are a vacation booking coordinator.

Your role is to help users plan and book trips by orchestrating available specialist agents.
You will discover available agents dynamically - each agent has a description and capabilities
that tell you what it can do.

When handling a vacation request, follow this general workflow:
1. **Gather information**: Get travel advice and destination recommendations from advisory agents.
2. **Check conditions**: Verify weather, availability, or other relevant factors before booking.
3. **Make bookings**: Reserve accommodations, transportation, or other services as needed.
4. **Summarize**: Provide the user with a complete summary of their trip details.

Use your judgment to determine which agents to consult based on their descriptions and the user's needs.
If an agent has an LLM, ask it for advice. If an agent has tools, call those tools with appropriate parameters.
"""

agent = Agent(
  card=agent_card,
  transport="http",
  registry="http",
  registry_url="http://localhost:9000",
  llm=llm,
  system_prompt=COORDINATOR_SYSTEM_PROMPT,
  verbosity=2,
)

await agent.start()
Protolink handles the routing, network request, and response parsing automatically.
You as the User only need to provide a complementary prompt to the Agent (later passed to the LLM), explaining the role and the logic. The agent/tool calling and final response generation is handled by protolink.
Our Agents in action
Let’s ask a simple question and see how our network of agents operates in order to get the final answer. Let’s ask a generic question and let the agents figure out and book our vacations:
Book me a relaxing vacation to Santorini for 5 nights in mid-July 2026
Now let’s see how we can interact dynamically with any agent we want on our system. For this example we want to send a Task to the Orchestrator agent with the previous User Query as the content. We will also specify in the Task that we want to invoke the Agent’s LLM for this task. From there and on the Agent will act autonomously, call other agents, tools etc.
Before continuing let’s answer the following question:
How does the LLM know how to call other agents’ LLMs or tools, call native tools, handle their outputs and return a final result?
How does an agent, when receiving a Task, knows what to do ? (call its LLM or tools etc.) ?
Answer: It’s all handled by Protolink’s internal logic. A Task is the top-level container that includes either a Message or an Artifact (as defined in the A2A specs). Each of these contains Parts, the atomic units of action that tell the agent exactly what to do.
- infer: Request another agent’s LLM to reason about a prompt and decide the next action.
- infer_output: The final response produced by the LLM after reasoning
- tool_call: Execute another agent’s specific tool with given arguments.
- tool_output: Contains the result returned by a tool execution
Running the System
Let’s define the Task. Feel free to play around with the input user query and try other questions.
from protolink.models import Task

user_query = "Book me a relaxing vacation to Santorini for 5 nights in mid-July 2026"
task = Task.create_infer(prompt=user_query)
The function Task.create_infer() is a convenience factory method that creates a Task with an infer message part. It tells the receiving agent to use its LLM to reason about the prompt.
The command above creates a Task that serializes to:
{
 “id”: “task_1f2a3b4c5d6e7f8g”,
 “messages”: [
   {
     “role”: “user”,
     “parts”: [
       {
       “type”: “infer”,
       “prompt”: “Book me a relaxing vacation to Santorini for 5 nights in mid-July 2026”
       }
      ]
   }
 ],
 “status”: “pending”
}
What is seen above is what will be sent over the wire to the other Agent.
So Protolink agents have already the interface and logic to communicate with other Agents and send/receive tasks. How do we send a Task and communicate with an Agent?
The answer is by using the AgentClient. This is a Client that also needs a Transport to operate and start communicating with the Agents.
The Agents themeselves use an AgentClient to send tasks and messages to other agents. In order to serve their endpoints they use an AgentServer, but it’s outside the scope of this tutorial.
There are two ways to initiate the AgentClient (the same goes for the Agent). 1) You can provide the type as str and define the url e.g. client = AgentClient(transport=”http”, url=”..”) or 2) pass a transport instance directly e.g. client = AgentClient(transport=HTTPTransport(url=”…”))
Let’s create an AgentClient.
from protolink.client import AgentClient

client = AgentClient(transport="http", url="http://localhost:8050")
Using the send_task function to send a task to the Agent.
result = await client.send_task(agent_url="http://localhost:8010", task=task)
Now the CoordinatorAgent receives the Task, parses it, sees that it’s an infer request and run the inference cycle using its LLM. Then the LLM decides to call other agents, get the info etc. and finally we get the result.
when printing the result, you should see something like this:
print(result.get_last_part_content())

> Output:

Great news! I've successfully booked your relaxing vacation to Santorini!

🌤️ **Weather Report for Santorini (July 2026):**
- Temperature: 32°C (86°F)
- Conditions: Sunny
- Humidity: 50%
- Wind: Light breeze
- Verdict: Perfect weather for a beach vacation!

🏨 **Hotel Booking Confirmed:**
- Hotel: Oia Boutique Hotel ⭐⭐⭐⭐
- Location: Santorini
- Check-in: July 15, 2026 at 15:00
- Check-out: July 20, 2026 at 11:00
- Duration: 5 nights
- Room: Double Room for 2 guests
- Amenities: Pool, Breakfast, WiFi
- Total Price: €900 EUR
- Booking ID: HTL-A7B3C2D1
- Cancellation: Free until 24h before check-in

Have a wonderful trip! 🏖️
🏆 That’s it, you did it ! 🏆
So by just defining prompts that just define the main role and the logic and the tools you want as simple python functions, you have an agent mesh that is gives the ability to each agent to communicate with its peers automatically to solve any problem. Feel free to experiment with other setups for different problems or even for general purpose apps. Google uses A2A for Agents, with tools for Google Drive, Email clients etc.
You can see this entire system in action in the examples/ticket_booking directory, where the agents contain some extra info that was not included in this guide and the all the code we saw in one place in the quickstart.py script.
Conclusion & Why This Matters
This isn’t just a demo, it’s a blueprint for scalable AI systems.
1. Transport Independence: Protolink agents speak HTTP today, but can speak WebSockets, gRPC, or in-memory queues tomorrow without changing agent code, just by changing one line of code.
2. Universal Tooling: Protolink supports the Model Context Protocol (MCP) via a built-in adapter. You can import tools from thousands of existing MCP servers (Google Drive, Slack, Postgres) instantly.
3. Resilience: By decoupling the Brain (LLM) from the Body (Agent), you are immune to provider outages or pricing changes.
4. Modular by Design: The Agent-as-an-Entity model means you can plug in any Transport, LLM, Tools, Storage etc. and swap them freely without rewriting your core logic.
5. Developer Freedom: The pluggable architecture means you own your stack. No vendor lock-in, no framework constraints, just clean, composable components.

Start Building
The age of the single-bot script is over. The age of the Agent Mesh is here.
Check out Protolink on GitHub and start building your own autonomous systems today & feel free to contribute !

— -
Based on the Vacation Booking example in the Protolink repository.
Your First Autonomous Agent Mesh — Easier Than You Think was originally published in Level Up Coding on Medium, where people are continuing the conversation by highlighting and responding to this story.