Able to Play Contents on Large Screens is Nice!
First of all, if all you are doing is playing your contents with the built-in VideoPlayer or AVPlayerViewController, you can skip the rest of this article!
Because! Those system UIs automatically provides a Button for us to select Airplay target device, ie: the external display, and upon selection, the system will route the contents to those automatically for us!

Now, suppose that you are still interested in checking out how we can detect routes (available airplay target / external display / whatever you call it), picking one, play our contents on it and control those remotely, let’s go!
As always, full demo on my GitHub!
(Optional) Set Up
If we want to support playing audible content in the background, we can add the background mode capability and check the Audio, AirPlay, and Picture in Picture check box.

Pick a Route (Airplay Device)
Let’s jump right in to one of the main dishes for today!
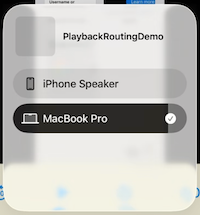
Presenting that TV Button (or actually, airplay.video is the symbol name) like the one above in the system UI for the user to tap on and stream audio/video content to an external Airplay device, such as a Mac or Apple TV.
AVRoutePickerView is what we will be using here!
The view itself is that button, and when the user taps the button, the system presents a popover (or sheet) that displays all of the nearby AirPlay devices that can receive and play back media.
Unfortunately, as you might already be able to guess, a lot of the UIs in the AVKit are UI-blah! Which means, we need a UIViewRepresentable
import AVKit

struct RoutePickerView: UIViewRepresentable {

    func makeUIView(context: Context) -> AVRoutePickerView {
        let routePickerView = AVRoutePickerView()

        // set delegate
        routePickerView.delegate = context.coordinator

        // Configure the route picker view
        routePickerView.backgroundColor = UIColor.clear
        routePickerView.tintColor = UIColor.black
        routePickerView.activeTintColor = UIColor.blue
        routePickerView.prioritizesVideoDevices = true

        return routePickerView
    }

    func updateUIView(_ uiView: AVRoutePickerView, context: Context) {
        uiView.setContentHuggingPriority(.defaultHigh, for: .horizontal)
        uiView.setContentHuggingPriority(.defaultHigh, for: .vertical)
    }

    func makeCoordinator() -> Coordinator {
        return Coordinator(self)
    }

    class Coordinator: NSObject, AVRoutePickerViewDelegate {
        var parent: RoutePickerView

        init(_ parent: RoutePickerView) {
            self.parent = parent
        }

        func routePickerViewWillBeginPresentingRoutes(_ routePickerView: AVRoutePickerView) {
            print(#function)
        }

        func routePickerViewDidEndPresentingRoutes(_ routePickerView: AVRoutePickerView) {
            print(#function)
        }

    }
}
Honestly speaking, we don’t have to have that AVRoutePickerViewDelegate here, but just in case you might want to respond to route picker view presentation events, here is how we can do it!
In addition, there are couple parameters we can configure on the the route picker view
- activeTintColor: The view’s tint color when AirPlay is active, ie: the contents is being played on an external display.
- prioritizesVideoDevices: A Boolean value that indicates whether the route picker sorts video output devices to the top of the list.
And of course, other ones defined on UIView are available as well!
Also, if we want to enable connections to non-AirPlay devices, we can use the AVRouting framework and set a customRoutingController. (Planning on writing more about this soon (hopefully), so please keep an eye out if you are interested!)
Now! Wait!
I thought that upon selecting the target device, our contents will be streamed to it automatically! Where do we get to set what contents we want to show?
I meant, the player property is only for MacOS?!
We will be getting into that in couple seconds, when we start playing some contents, so let’s put it away for right now and come back to it!
Before we move on, let’s give our RoutePickerView a try really quick!
struct ContentView: View {
var body: some View {
RoutePickerView()
}
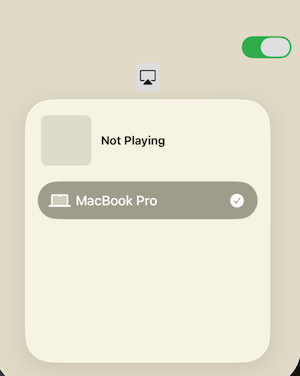
}Run it on a real device, without using iPhone mirroring, and if you have any available AirPlay devices nearby, you should be able to see the that selection sheet above showing up!
But what if we don’t?
That button is just hanging there and when we tap on it nothing shows up! Which is obviously not a really good user experience!
Wouldn’t be a lot better if we can disable or hide our RoutePickerView if there are not target devices nearby?
Detect Available Routes
AVRouteDetector is a class that we can use to detect whether there are available media playback routes or not (but not what they are exactly).
- We create an instance of the AVRouteDetector
- Set up handlers for the AVRouteDetectorMultipleRoutesDetectedDidChange notification
- Start detection by setting the isRouteDetectionEnabled to true
import Combine

@Observable
class PlaybackManager {

    var isDetectingRoutes: Bool = false {
        didSet {
            // Enabling route detection significantly increases power consumption.
            // Only Turn it on when we need it.
            self.routeDetector.isRouteDetectionEnabled = isDetectingRoutes
        }
    }


    private(set) var routesDetected: Bool = false

    private let routeDetector: AVRouteDetector = AVRouteDetector()

    @ObservationIgnored
    private var routeDetectionCancellable: AnyCancellable?

    init() {
        // Set detectsCustomRoutes to true if your app uses an instance of AVCustomRoutingController.
        self.routeDetector.detectsCustomRoutes = false
        self.setupRouteDetectionNotification()
    }

    deinit {
        self.routeDetectionCancellable?.cancel()
        self.routeDetectionCancellable = nil
    }

    private func setupRouteDetectionNotification() {
        // AVRouteDetectorMultipleRoutesDetectedDidChange: A notification the system posts when changes occur to its detected routes.
        self.routeDetectionCancellable = NSNotification.Name.AVRouteDetectorMultipleRoutesDetectedDidChange.publisher.receive(
            on: DispatchQueue.main
        ).sink { _ in
            if self.isDetectingRoutes {
                self.routesDetected = self.routeDetector.multipleRoutesDetected
            }
        }
    }
}

extension Notification.Name {
    var publisher: NotificationCenter.Publisher {
        return NotificationCenter.default.publisher(for: self)
    }
}
I am using Combine here but of course, you can use the legacy NotificationCenter if you like. If you want a little read on that, here we go! SwiftUI Notifications: From NotificationCenter to Combine!
Now, couple notes here!
- Enable route detection significantly increases power consumption. Turn it off when we no longer need it. For example, we can turn it off immediately when we receive a notification where the multipleRoutesDetected becomes true.
- Within the notification handler, I am checking whether if we are currently detecting or not by inspecting the isRouteDetectionEnabled property before assigning a value to routesDetected. This is because when isRouteDetectionEnabled going from true to false, ie: we are turning off the route detection, a notification will also be posted and multipleRoutesDetected will be false in that case which is not what we are intersected in here.
Here is how we might want to use it. (We will put together something a little nicer in couple seconds but let’s just confirm that we are indeed detecting nearby routes as we expect!)
struct ContentView: View {
    @State private var playbackManager: PlaybackManager = PlaybackManager()
    var body: some View {
        VStack {
            Toggle(isOn: $playbackManager.isDetectingRoutes, label: {})
            if self.playbackManager.routesDetected {
                RoutePickerView()
            }
        }
    }
}
Play Contents
Picking routing device is not the goal!
Our goal is to play some contents on those devices!
So!
Let’s add in a AVPlayer to play some videos!
Since the VideoPlayer already contains route picking controls, I will be using AVPlayerViewController here so that we can hide the system ones and implement our own.
Final code, then to the crucial points!
import SwiftUI
import Combine
import AVKit

extension Notification.Name {
    var publisher: NotificationCenter.Publisher {
        return NotificationCenter.default.publisher(for: self)
    }
}

@Observable
class PlaybackManager {

    // MARK: Routes Detection properties
    var isDetectingRoutes: Bool = false {
        didSet {
            // Enabling route detection significantly increases power consumption.
            // Only Turn it on when we need it.
            self.routeDetector.isRouteDetectionEnabled = isDetectingRoutes
        }
    }


    private(set) var routesDetected: Bool = false

    private let routeDetector: AVRouteDetector = AVRouteDetector()

    @ObservationIgnored
    private var routeDetectionCancellable: AnyCancellable?


    // MARK: AVPlayer properties
    private(set) var player: AVPlayer

    var isExternalPlaybackActive: Bool {
        return self.player.isExternalPlaybackActive
    }

    var currentPlayerItem: AVPlayerItem? {
        return self.player.currentItem
    }

    var playerStatus: AVPlayer.TimeControlStatus {
        return self.player.timeControlStatus
    }

    var playbackRate: Float {
        get {
            return self.player.rate
        }
        set {
            self.player.rate = newValue
        }
    }


    // MARK: init & deinit
    init() {
        // to support monitoring playback state with Observation
        AVPlayer.isObservationEnabled = true

        let player = AVPlayer()
        player.volume = 1.0
        player.allowsExternalPlayback = true
        player.externalPlaybackVideoGravity = .resizeAspect
        // If we are managing multiple AVPlayers within our app and we only want to play a specific one on the external play, set usesExternalPlaybackWhileExternalScreenIsActive for the one we want to display to true, and leave the rest as false.
        // player.usesExternalPlaybackWhileExternalScreenIsActive = true
        self.player = player

        // Set detectsCustomRoutes to true if your app uses an instance of AVCustomRoutingController.
        self.routeDetector.detectsCustomRoutes = false
        self.setupRouteDetectionNotification()

        // set up audio session
        let audioSession = AVAudioSession.sharedInstance()
        do {
            try audioSession.setCategory(.playback, mode: .default, policy: .longFormVideo)
            try audioSession.setActive(true)
        } catch(let error) {
            print(error)
        }
    }

    deinit {
        self.routeDetectionCancellable?.cancel()
        self.routeDetectionCancellable = nil
        try? AVAudioSession.sharedInstance().setActive(false)
    }

}


// MARK: Player controls
extension PlaybackManager {
    func updatePlayerItem(_ url: URL) {
        let playerItem = AVPlayerItem(url: url)
        self.player.replaceCurrentItem(with: playerItem)
    }

    func play() {
        if self.player.currentTime() == self.currentPlayerItem?.duration {
            self.seek(to: CMTime(seconds: 0, preferredTimescale: 1))
        }
        self.player.play()
    }

    func pause() {
        self.player.pause()
    }

    // fast forward, fast backward
    func seek(by delta: Double) {
        let targetTime = self.player.currentTime().seconds + delta

        self.seek(to: CMTime(seconds: targetTime, preferredTimescale: 1))
    }

}


// MARK: Private helpers
extension PlaybackManager {

    private func seek(to time: CMTime) {
        self.player.seek(
            to: time,
            toleranceBefore: .zero,
            toleranceAfter: .zero
        )
    }


    private func setupRouteDetectionNotification() {
        // AVRouteDetectorMultipleRoutesDetectedDidChange: A notification the system posts when changes occur to its detected routes.
        self.routeDetectionCancellable = NSNotification.Name.AVRouteDetectorMultipleRoutesDetectedDidChange.publisher.receive(
            on: DispatchQueue.main
        ).sink { _ in
            if self.isDetectingRoutes {
                self.routesDetected = self.routeDetector.multipleRoutesDetected
            }
        }
    }
}

struct ContentView: View {
    @State private var playbackManager: PlaybackManager = PlaybackManager()
    var body: some View {
        NavigationStack {
            VStack(spacing: 24) {
                VStack(spacing: 16) {
                    HStack {
                        Text("Detect Routing Device")
                            .lineLimit(1)
                            .minimumScaleFactor(0.8)
                            .layoutPriority(1)

                        Toggle(isOn: $playbackManager.isDetectingRoutes, label: {})
                    }

                    HStack {
                        Text("Pick Routing Device")
                            .lineLimit(1)
                            .minimumScaleFactor(0.8)
                            .layoutPriority(1)
                        Spacer()
                        if self.playbackManager.routesDetected {
                            RoutePickerView()
                        } else {
                            Image(systemName: "airplay.video.badge.exclamationmark")
                                .resizable()
                                .scaledToFit()
                                .frame(height: 24)
                                .foregroundStyle(.gray)
                        }
                    }
                }

                VideoPlayer(player: self.playbackManager.player)
                    .padding(.vertical, 8)

                HStack {
                    Button(action: {
                        self.playbackManager.seek(by: -10)
                    }, label: {
                        Image(systemName: "10.arrow.trianglehead.counterclockwise")
                    })

                    Spacer()

                    Button(action: {
                        self.playbackManager.playerStatus == .playing ? self.playbackManager.pause() : self.playbackManager.play()
                    }, label: {
                        Image(systemName: self.playbackManager.playerStatus == .playing ? "pause.fill" : "play.fill" )
                    })

                    Spacer()

                    Button(action: {
                        self.playbackManager.seek(by: 10)
                    }, label: {
                        Image(systemName: "10.arrow.trianglehead.clockwise")
                    })

                    Spacer()

                    Menu(content: {
                        Button(action: {
                            self.playbackManager.playbackRate = 0.5
                        }, label: {
                            Text("0.5x")
                        })
                        Button(action: {
                            self.playbackManager.playbackRate = 1.0
                        }, label: {
                            Text("1.0x")
                        })
                        Button(action: {
                            self.playbackManager.playbackRate = 2.0
                        }, label: {
                            Text("2.0x")
                        })

                    }, label: {
                        Text("\(String(format: "%.1f", self.playbackManager.playbackRate))x")
                    })

                }
                .font(.title2)
                .fontWeight(.medium)
            }
            .padding(.vertical, 16)
            .padding(.horizontal, 24)
            .frame(maxWidth: .infinity, maxHeight: .infinity)
            .background(.yellow.opacity(0.1))
            .onAppear {
                guard let url = Bundle.main.url(forResource: "demo", withExtension: "mp4") else {
                    return
                }

                self.playbackManager.updatePlayerItem(url)
            }
            .navigationTitle("AirPlay Demo")

        }
    }
}


struct VideoPlayer: UIViewControllerRepresentable {
    let player: AVPlayer

    init(player: AVPlayer) {
        self.player = player
    }

    func makeUIViewController(context: Context) -> AVPlayerViewController {
        let playerController = AVPlayerViewController()

        playerController.showsPlaybackControls = false
        playerController.player = self.player

        return playerController
    }

    func updateUIViewController(_ playerController: AVPlayerViewController, context: Context) {
        playerController.updatesNowPlayingInfoCenter = true
    }
}


struct RoutePickerView: UIViewRepresentable {

    func makeUIView(context: Context) -> AVRoutePickerView {
        let routePickerView = AVRoutePickerView()

        // set delegate
        routePickerView.delegate = context.coordinator

        // Configure the route picker view
        routePickerView.backgroundColor = UIColor.clear
        routePickerView.tintColor = UIColor.black
        routePickerView.activeTintColor = UIColor.blue
        routePickerView.prioritizesVideoDevices = true

        return routePickerView
    }

    func updateUIView(_ uiView: AVRoutePickerView, context: Context) {
        uiView.setContentHuggingPriority(.defaultHigh, for: .horizontal)
        uiView.setContentHuggingPriority(.defaultHigh, for: .vertical)
    }

    func makeCoordinator() -> Coordinator {
        return Coordinator(self)
    }

    class Coordinator: NSObject, AVRoutePickerViewDelegate {
        var parent: RoutePickerView

        init(_ parent: RoutePickerView) {
            self.parent = parent
        }

        func routePickerViewWillBeginPresentingRoutes(_ routePickerView: AVRoutePickerView) {
            print(#function)
        }

        func routePickerViewDidEndPresentingRoutes(_ routePickerView: AVRoutePickerView) {
            print(#function)
        }

    }
}
Note that the video will not show up initially on the mac until we actually start playing it! Regardless of the value of usesExternalPlaybackWhileExternalScreenIsActive.
NOW! Couple Points!
One!
We have NOT specify what contents we want the airplay destination to display, why is our video playing on the Mac?
When we set the allowsExternalPlayback property to true (actually, the default value is true anyway) and we are indeed routing to an external display, that display will automatically play the active content, ie: the video that is being played, in our app. And that’s why our video will not show up initially on the mac until we actually start playing it!
Now, what if we have multiple VideoPlayer playing different AVPlayers?
When we indeed routed to an external display,
- None of those video will be played within our app, ie: the video is playing on “…” message, for all VideoPlayer views.
- Those videos cannot be played simultaneously anymore, unless they are coordinated like what we had in my previous article SwiftUI: Synchronized MultiView Playback
- The one being played on the external display is the video for the AVPlayer that is currently playing, and if we switch to play another video, the one being played on the external display will switch to that one automatically.
Now, if you do have multiple AVPlayers that are coordinated and suppose to be playing simultaneously, set usesExternalPlaybackWhileExternalScreenIsActive to true for the player that you want to display on the external display, and the rest to false.
Two!
Control Video playback Remotely!
Wait!
We are not doing anything special here, aren’t we?
Calling play, pause, seek just like we would when paying those within our device!
Yes, and that’s actually why I decided to point it out!
We don’t need that MPRemoteCommandCenter!
If we take a look at this class, there are pauseCommand , playCommand , and stopCommand which might make you want to use those! But actually, those are for responding / handling those events within our app, not for controlling remotely! Check out the Handling external player events notifications documentation if you are interested!
Thank you for reading!
That’s it for this article!
Again, feel free to grab the code from my GitHub!
Happy Airplay-ing!
SwiftUI: Support AirPlay to Route Playback To Other Devices was originally published in Level Up Coding on Medium, where people are continuing the conversation by highlighting and responding to this story.


