One of the easiest and most flexible new ideas in language model tools is the idea of skills. You can build these yourself easily and plug them into your favourite language model app. You can also share them and download other peoples skills using cool new standards like skills.sh. But before you do any of that, lets try and understand what they are.
Skills is a term referring to a format for providing discrete context pieces to models that are task related. It comes from an Anthropic technical specification, for a standard supported in their products like Claude Code. This specification has seen widespread adoption and is support by all/most major language models. The idea is actually not very complicated, and essentially boils down to succinctly describing and templating how particular named tasks should be done. It is critical to note that the language model is not trained to do the thing in the skill specifically. It is using your description of the task — and how to accomplish it — to obtain the new skill. It relies on an idea called progressive disclosure, which means we do not want to clutter the model’s context with all the details. It will load just enough information to know what skills are available, and then load the details when it needs them.
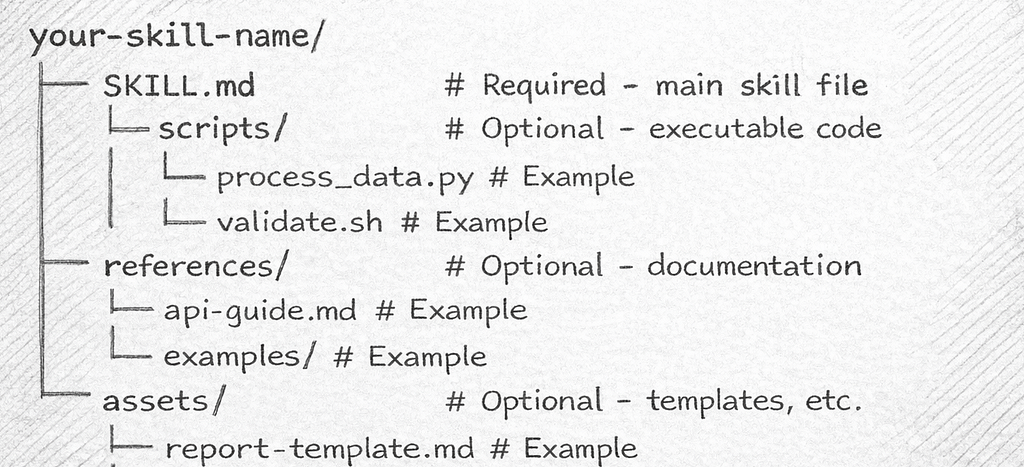
The first key thing to understand is that a skill is nothing more than a small collection of files inside a directory for that skill. Each one of these individual skill directories needs to be in a place that your language model agent can find it. But generally it will be inside a directory called skills within the agent specific config directory.
For example, both Copilot and Claude support having master skills located within their hidden directories of your home folder. That is ~/.copilot/skills and ~/.claude/skills respectively. Alternatively, Claude allows you to have project specific skills just by creating them inside a .claude/skills directory at the root of your project. Let’s make this concrete by creating a new skill for ourselves called prepare-pr that will run some simple checks before we issue pull requests. I create the following folder structure in my home directory as I want to define this skill once and use it in multiple projects:
~/.claude/skills/prepare-pr
The first thing we need for our skill is a file called SKILL.md that contains the a snippet of YAML to define the skill and additional context. In fact this file is the only requirement to have a functioning skill. Everything else we will discuss are just optional features. Note: the name of the file SKILL.md is case sensitive and it cannot be anything else. Inside that file the only required content is a YAML header that looks like the following:
---
name:
description:
---
The name and description of your skill are the core pieces of information that your language model will use to determine when to use it. The name should match the folder name and be all lower case letters in skewer case: meaning lower case words separated by hyphens (no spaces or underscores allows). So for our skill we populate the YAML header with the following:
---
name: prepare-pr
description: Prepares for a pull request when the user enters the phrase "Prepare PR"
---
Now, there are other fields that can be added to YAML header, but they are all optional. These include things like specifying a license or the compatibility of the skill (including required applications like git).
We can ignore those options and just go ahead and create our minimal skill as follows:
---
name: prepare-pr
description: Prepares for a pull request when the user enters the phrase "Prepare PR"
---

# Prepare PR

Use the prepare-pr skill when the user enters the phrase "Prepare PR" in
the chat

Check if all changed files have been commited and pushed to repository.
Do not check for uncommited files.

If all changed files are checked in, then respond by printing
a thumbs up emoji to the screen.

If there are changed files not checked in, then respond by printing
a thumbs down to the screen.
In the body of the SKILL.md file we have now created a text description of the task. This description includes a concise outline of what should be done, followed by some conditional logic on how to respond after the task is done. In this case, there are only two outcomes, we either get a thumbs up or a thumbs down emoji in our terminal depending on the state of our git repository.
You should note, that in this skill we are implicitly assuming that the language model agent has knowledge of what git is and how to check for files that are both modified and not committed. This works because git is such a widely used tool. If instead you need the skill to use a rare tool, or something completely bespoke then you will need to provide detailed instructions.
An alternative is to write a script that performs the exact job you want done and place it inside a scripts subdirectory. We will add this to our skill to make the process consistent across applications. First we create a file called scripts/check_git_modified_uncommitted_files.sh as a BASH script to do exactly what we want, with the following content:
git diff-index --quiet HEAD
if [ $? -ne 0 ]; then
  exit 1
else
  exit 0
fi
Then we modify our SKILL.md to refer to that script, modifying the conditional logic to depend on the expected outputs of the script.
---
name: prepare-pr
description: Prepares for a pull request when the user enters the phrase "Prepare PR"
---

# Prepare PR

Use the prepare-pr skill when the user enters the phrase "Prepare PR"
in the chat

Run the [script](scripts/check_git_modified_uncommited_files.sh) to
determine if there are uncommited changes.

If the script responds with a value of 0, then print a thumbs up emoji
followed by "All good mate"

If the script responds with a value of 1, then print a thumbs down emoji
followed by "Uncommited changes"
It is worth noting at this point we could have just written a BASH script to do the whole job. Making it into a skill for a language model is slightly easier to create, but complete overkill, and ultimately it is just wasting tokens on a task that could be explicitly solved with a dedicated script. The real value ultimately comes as you build on these ideas and include process steps that can be described but not explicitly enumerated, either easily or at all.
For example, we might want this preparation process to include a check as to whether there are untracked files that our committed files depend on. This is a common collaboration problem, the code works on your machine, but not for your colleague because you forgot to add something to the repo. Finding untracked files is an easy script, but then determining if other files depend on them could be a harder task. At the very least it would require some skilled grepping of your code base. We can extend our skill to do this for us by making the content of SKILL.md read as follows:
---
name: prepare-pr
description: Prepares for a pull request when the user enters the phrase "Prepare PR"
---

# Prepare PR

Use the prepare-pr skill when the user enters the phrase "Prepare PR"
in the chat.

The check consists of two stages.

Step 1. Check for uncommited changes to files already in the repository.

Run the [script](scripts/check_git_modified_uncommited_files.sh) to
determine if there are uncommitted changes.

If the script responds with a value of 0, then print a thumbs up emoji
followed by "All Changes Committed"

If the script responds with a value of 1, then print a thumbs down emoji
followed by "Uncommitted changes"


Step 2. Check if there are untracked files that the committed files depend on.

Get a list of all the untracked files and iterate over them.

For each untracked file check if there is an include statement or link
or mention of the untracked file inside any of the committed files.
Any connection to the untracked file is a reference we need to flag.

If you find any references to an untracked file then print a thumbs down
emoji followed by "Untracked File Dependencies"

After that output a report on the dependencies according to the
[template](assets/untracked_file_dependency.md) to the screen to list
both the untracked file and the committed files that appears to depend on it.

If there are no references to any of the untracked files, then print a
thumbs up emoji followed by "No Untracked File Dependencies"
You should have noticed that our updated SKILL.md file references a new markdown file inside a directory called assets within the skill. This is directory is another part of the standard, but unlike the scripts directory this directory should contain static asset files such as templates for output. The content of our new template file assets/untracked_file_dependency.md is shown below:
// Template for reporting dependencies on uncommitted files

## Uncommitted File: {uncommited_file_name}

### Dependencies

| File         | Line Numbers   |
|--------------|----------------|
| {file_name}  | {line_numbers} | // Repeat this line for each dependency
We use // for comments that explain to the model what is happening inside the template. We then create a markdown structure and delineate template {parameters} inside curly brackets to show the values the model should fill in when applying the template. In this case the model will create a markdown table of all the references to our untracked files.
This example works cleanly for me using Claude Code. At Intersect AI, we have extended this idea to include a range of other checks such as code linting, type checking and code style compliancy. Essentially, anything you want your team members to do before issuing a PR could be included into a skill like this, and then shared, making it easier to impose standards and reduce errors.
Hopefully, this post has quickly demystified skills for you. The take home is that Skills are just a collection of text files and scripts organised in folders such that models can load them when they are appropriate without polluting their context with all the details.
In some ways they are similar to tools, except that they rely on the model being run inside a harness (like Claude Code) that allows them to execute code inside a terminal. Code execution is not essential though, you could use them just as a way to create a series of templates and custom instructions for how you want a model to respond and generate content.
If you want to dig deeper into the specification for skills then I highly recommend Anthropic’s Complete Guide to Building Skills document.
The Simple Guide to Agent Skills was originally published in Level Up Coding on Medium, where people are continuing the conversation by highlighting and responding to this story.


