
In the first article of the Protégé series, we discussed the basic idea of Protégé, why, when, and what. In this article, we will install the Protégé locally and find our way around
What You’ll Achieve in This Part
By the end of this tutorial, you won’t just have Protégé Desktop installed — you’ll:
Understand how to navigate the interface confidently
Know where to find classes, properties, and individuals
Run a reasoner for the first time
Create your first mini ontology
Which Version Should You Use?
Protégé comes in two flavors, and you should use both — they serve different purposes.
Protégé Desktop (version 5.x) is a full-featured Java application that runs on your computer. It supports all advanced OWL features, integrates with powerful reasoning engines, and is the tool you use when building, editing, and testing an ontology seriously. This is where the real work happens.
WebProtégé is a browser-based version hosted at webprotege.stanford.edu. It is designed for collaborative editing — multiple people can work on the same ontology simultaneously, with change tracking, comments, and version history. Think of it as Google Docs for ontologies. It has fewer advanced features than the Desktop version, but is unbeatable for team workflows.
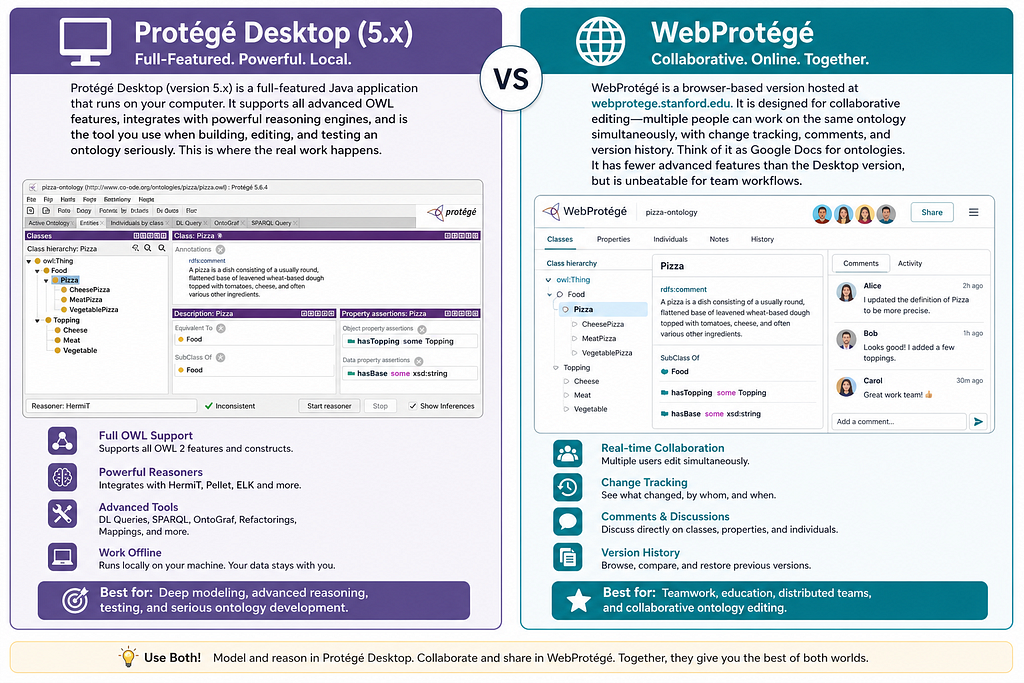
Fig. 1 shows WebProtégé focuses on collaboration, while Protégé Desktop exposes deeper modeling and reasoning tools. In this blog, we will start with the desktop to learn the fundamentals.
Installing Protégé Desktop
Protégé requires Java 11 or later. Check your Java version first:
java -version
If Java is not installed, download it from adoptium.net (Eclipse Temurin is the recommended distribution) before proceeding.
Step 1: Go to protege.stanford.edu and click Download Protégé Desktop. Select the installer for your operating system (Windows, macOS, or Linux).
Step 2: Run the installer. On macOS, you may need to right-click ->Open the first time to bypass Gatekeeper. On Windows, run the`.exe as administrator.
Step 3: Launch Protégé. On first launch, it will ask if you want to check for updates — say yes.
Step 4: Install the reasoner plugin. Go to File -> Check for Plugins. In the plugins dialog, find HermiT and Pellet and install both. These are the reasoning engines that will let your ontology infer new facts. Restart Protégé after installing.
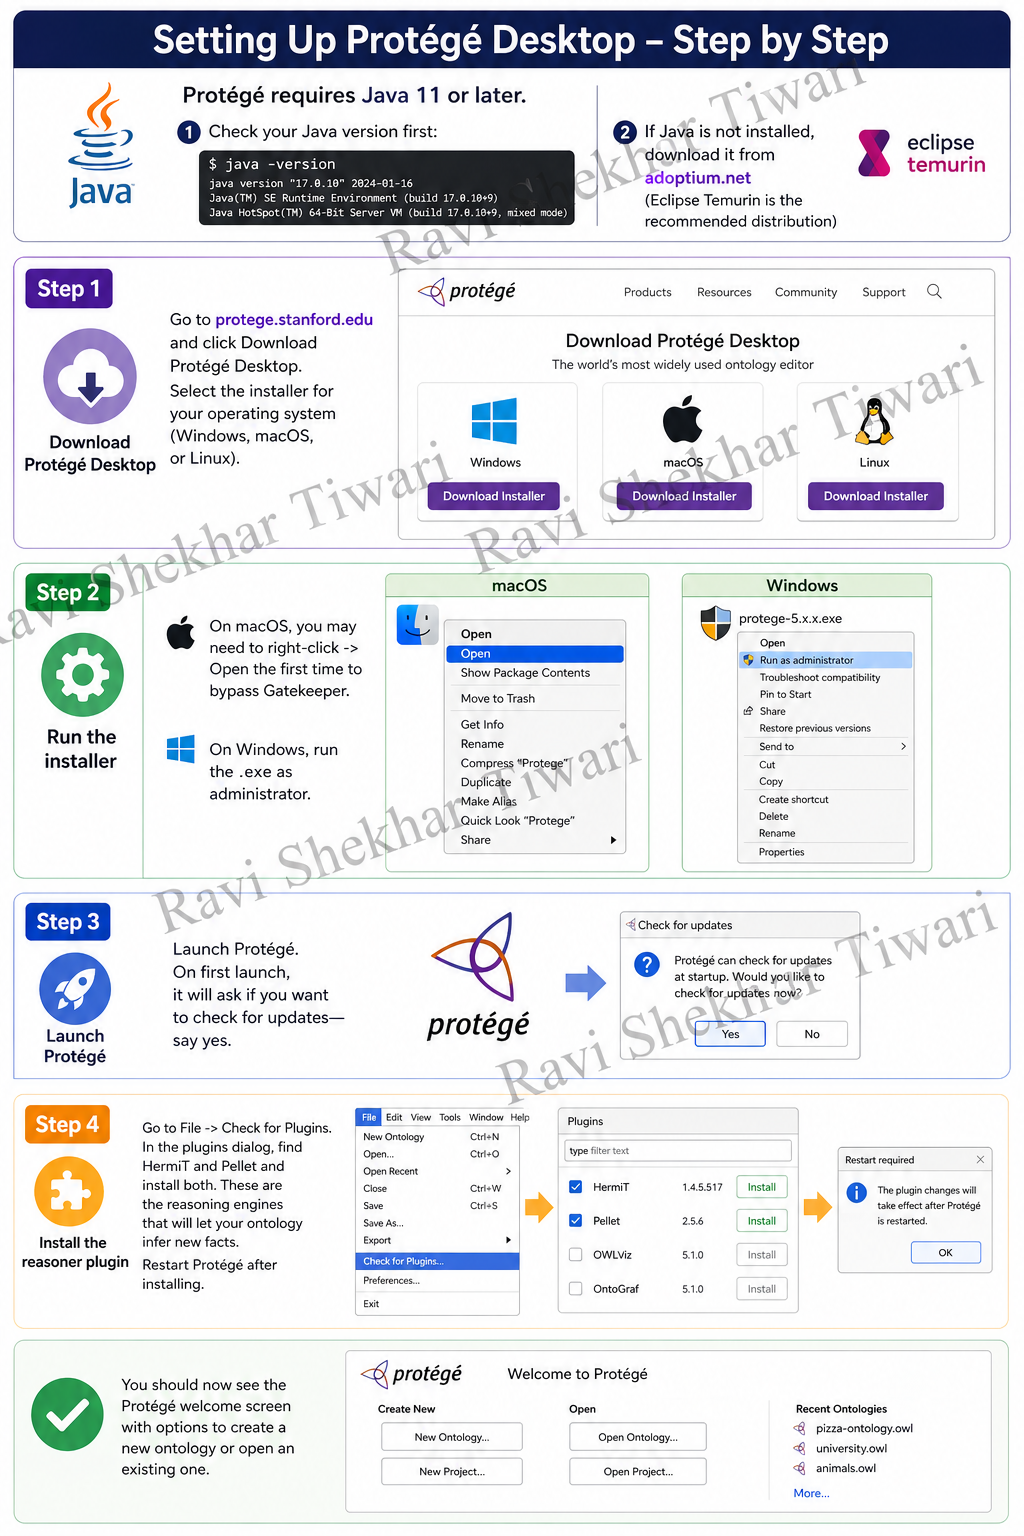
Fig. 2 Pay attention to Java setup before installation, Plugin installation (HermiT, Pellet) and restart requirement after plugins. Missing the restart step is a common source of confusion.
You should now see the Protégé welcome screen with options to create a new ontology or open an existing one.
The Protégé Desktop Interface — A Map
The interface looks overwhelming on first launch. It is not, once you know what each panel does. Here is a tour of the six main areas:
The Menu Bar at the top gives you File, Edit, View, Reasoner, Window, and Help menus. The most important ones are Reasoner (to run inference) and View (to customize the panels visible on screen).
The Ontology IRI field at the top of the workspace shows the identifier for your ontology — a URI like http://www.example.com/my-ontology.owl. This is how ontologies identify themselves on the Semantic Web. For personal projects, the URI does not need to resolve to a real webpage, but it should be unique.
Why the Ontology IRI Matters
The IRI (like http://www.example.com/my-ontology.owl ) is not just a label. It acts as a global identifier for your ontology on the Semantic Web.
Even if it doesn’t resolve to a real webpage, it should be unique to avoid conflicts.
The Tab Bar, just below the menu bar, lets you switch between the main editing views. The default tabs are:
- Active Ontology — metadata about your ontology (IRI, imports, annotations)
- Entities — a unified view of all classes, properties, and individuals
- Classes — the class hierarchy editor (you will spend most of your time here)
- Object Properties — relationships between individuals
- Data Properties — relationships between individuals and literal values
- Individuals— specific instances of your classes
- OWLViz — a graphical visualization of your class hierarchy
- DL Query — a query interface for interrogating your ontology after reasoning
The Class Hierarchy Panel (bottom left in the Classes tab) shows the tree of classes in your ontology. Every ontology starts with one root class: owl:Thing, which is the parent of all classes in OWL.
The Class Description Panel (bottom right) shows the logical definition of the currently selected class — its superclasses, equivalent classes, and axioms.
The Annotations Panel (top right) lets you add human-readable labels, comments, and documentation to any entity.
Do not worry about memorizing all of this. You will learn the panels naturally as you use them. The two you will use most are the Class Hierarchy and Class Description panels. Everything else is secondary.
The Entities Tab Shortcut
One thing beginners do not discover early enough: the Entities tab at the top gives you a single unified search and browse view of everything in your ontology — classes, properties, and individuals together. If you cannot find something in a specific tab, the Entities tab’s search box will find it instantly. Make this your first stop whenever you are looking for something.
Your First Ontology
Let’s make this concrete.
Step 1: Create a New Ontology
Open Protégé -> Click Create New Ontology
Set IRI as: http://www.example.com/student-ontology
Step 2: Create Your First Classes
Go to the Classes tab
Right-click on owl:Thing->Add subclass ->Name it Person
Right-click on Person->Add subclass ->Name it Student
You’ve just created your first class hierarchy.
Step 3: Add an Individual
Go to the Individuals tab
Click “+” -> Create individual John
Assign it to class Student
Now you have data inside your ontology.
Step 4: Run the Reasoner
Go to Reasoner ->Start Reasoner
Choose HermiT (installed earlier)
This is where the magic happens: the system can now infer new knowledge from what you defined.
Why Reasoners Matter
Reasoners like HermiT and Pellet are what make ontologies powerful. They don’t just store facts — they derive new ones.
For example:
If Student is a subclass of Person and John is a Student. The reasoner automatically infers: John is also a Person. This is the foundation of semantic intelligence.
Common Beginner Mistakes (Avoid These)
- Skipping plugin installation → No reasoning capability
- Not restarting Protégé after installing plugins
- Confusing Classes vs Individuals
- Classes = categories (Person)
- Individuals = instances (John)
- Ignoring the Entities tab -> makes navigation harder than necessary
- Overthinking the IRI -> it just needs to be unique, not live
Where to Go Next
You now have:
Protégé installed
A working understanding of the interface
Your first ontology was created
A reasoner up and running
In the next part, we’ll move from Protégé Desktop-this is where ontology engineering truly begins to WebProtégé.
If you have any queries, feel free to contact me with any of the following options:
Website: www.rstiwari.com
Medium: https://tiwari11-rst.medium.com
Portfolio: https://portfolio.rstiwari.com/
PART 2: Installing Protégé Desktop and Finding Your Way Around was originally published in DataDrivenInvestor on Medium, where people are continuing the conversation by highlighting and responding to this story.