Learn Basic of FastAPI: The Most Popular Web Frameworks tp build API in Python
Introduction: What Are We Building and Why?
This is a 3 series of tutorials hands-on one of the most pupolar web frameworks FastAPI.
- Part 1: Introduction to FastAPI (This Articles)
- Part 2: Intermediate FastAPI (Coming Soon)
- Part 3: Advanced FastAPI (Coming Soon)
Have you ever used an app on your phone — like Instagram, TikTok, or Spotify — and wondered: ”Where does all this data come from?”
The answer is: an API.
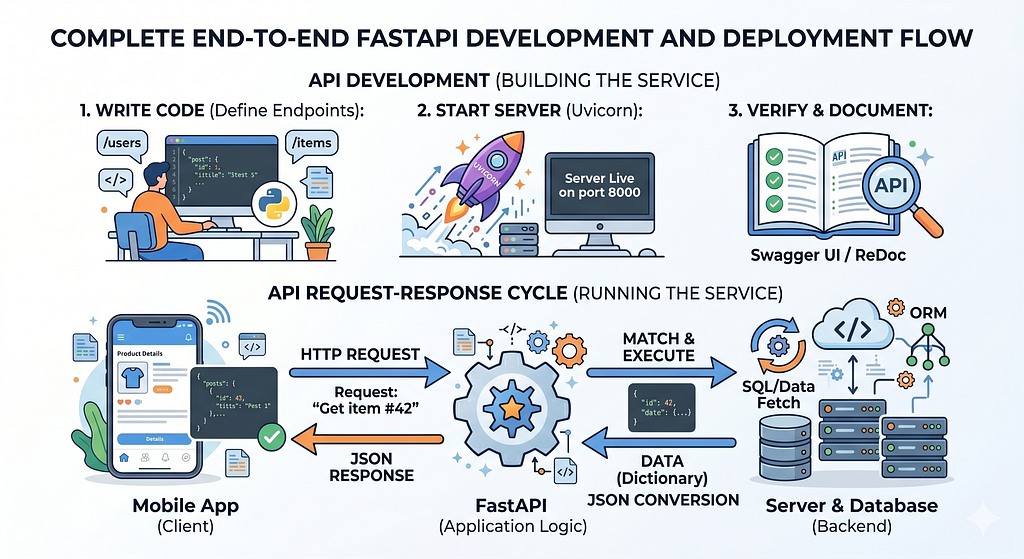
When you open Instagram and see your feed, your phone sends a request to Instagram’s server saying: ”Hey, give me the latest posts!” The server processes that request and sends back a response — a list of posts in a format your phone can understand (usually JSON).
That middle layer between your phone (frontend) and the database (where data lives) is called an API — or more specifically, a REST API.

So What is FastAPI?
FastAPI is a Python framework that makes it incredibly easy to build APIs. Instead of writing hundreds of lines of code, you can create a fully functional API in just a few lines. It’s like the difference between building a house from scratch versus using pre-built blocks.
FastAPI was created by Sebastián Ramírez and has since become one of the most popular Python frameworks for building APIs. It’s used by companies like Microsoft, Netflix, Uber in production.
Why Choose FastAPI Over Other Frameworks?
Python has several web frameworks for building APIs. The three most popular are Django, Flask, and FastAPI. Here’s how they compare:

Key advantages of FastAPI:
- Blazing Fast Performance — FastAPI is built on top of Starlette (for web handling) and Pydantic (for data validation). This combination gives it performance which are considered faster in Python.
- Automatic Data Validation — When someone sends data to your API, FastAPI automatically checks if the data is correct (right type, right format, required fields present). You don’t have to write validation code manually.
- Automatic API Documentation — FastAPI generates interactive documentation (Swagger UI) for your API automatically. This means you don’t need to write a separate documentation — it’s built in.
- Python Type Hints — FastAPI uses Python’s type hints to understand your code. This gives you autocompletion in your editor, fewer bugs, and cleaner code.
- Async Support — FastAPI supports Python’s async/await syntax, which means your API can handle thousands of requests simultaneously without getting stuck.
- Editor Autocompletion — Because FastAPI uses type hints, your editor (VS Code, PyCharm) can give you autocompletion for request data. This is a huge productivity boost that other frameworks don’t offer natively.
Prerequisites: What You Need Before Starting
Before we start building, make sure you have the following set up on your computer:
- Python 3.8 or Higher: FastAPI requires Python 3.8 or newer.
- A Text Editor: You need a code editor to write your Python code. Here are some popular options: VS Code, PyCharm, Cursor, AntiGravity etc.
- Basic Python Knowledge: You don’t need to be a Python expert, but you should be familiar with: Variables, Functions, Imports, Dictionaries, Lists.
- Basic Understanding of API
- Understanding of Virtual Environment: At least know how to create virtual environment, install packages etc.
Installing FastAPI and Its Dependencies
Open your terminal, activate your virtual environment, and run the following command:
!pip install fastapi uvicorn
What Are We Installing?
- fastapi: The main framework for building APIs.
- uvicorn: An ASGI server that runs your FastAPI app, FastAPI doesn’t have its own server — uvicorn acts as the engine that runs it.
- FastAPI is the blueprint of your house (it defines what your API looks like and how it works). Uvicorn is the construction worker that actually builds and runs it. Without uvicorn (or another ASGI server), your FastAPI code is just a blueprint — it won’t actually run.
- ASGI: stands for Asynchronous Server Gateway Interface. It’s a specification (a set of rules) for how web servers communicate with Python web applications. Think of it as a standardized plug — ASGI is the plug type, and Uvicorn is the specific plug that works with FastAPI.
Verifying the Installation
After installing, let’s verify everything is set up correctly:
import fastapi
import uvicorn

print(f"FastAPI version: {fastapi.__version__}")
print(f"Uvicorn version: {uvicorn.__version__}")
print("\nBoth packages are installed successfully!")
Understanding How FastAPI Works (The Big Picture)
Before we write any code, let’s understand the flow of how a FastAPI application works:
HTTP Methods: Understanding GET, POST, PUT, and DELETE
When a client communicates with your API, it uses different HTTP methods to indicate what it wants to do. These methods are also called HTTP verbs:

Hello World — Your First API!
Now, let’s build our first API! We’ll start with the classic Hello World example.
Create a new file called main.py and add the following code:
from fastapi import FastAPI

# Create a FastAPI instance
app = FastAPI()

# Define a root route (endpoint)
@app.get("/")
def read_root():
    return {"message": "Hello World"}

# GET request — used to retrieve data (like fetching a webpage)
@app.get("/hello")
def hello_get():
    return {"message": "This is a GET request — used to read data"}


# POST request — used to create new data (like submitting a form)
@app.post("/hello")
def hello_post():
    return {"message": "This is a POST request — used to create data"}


# PUT request — used to replace existing data (like updating your profile)
@app.put("/hello")
def hello_put():
    return {"message": "This is a PUT request — used to replace data"}


# DELETE request — used to delete data (like removing an account)
@app.delete("/hello")
def hello_delete():
    return {"message": "This is a DELETE request — used to delete data"}
Some Code Explanation
app = FastAPI()
This creates an instance of the FastAPI class and assigns it to the variable app. This app object is the heart of your application — it:
- Stores all your routes (URLs that your API responds to).
- Handles incoming requests.
- Manages responses.
- Generates the API documentation (Swagger UI and ReDoc).
@app.get("/")
def read_root():
    return {"message": "Hello World"}
This is a decorator — a special Python syntax that modifies the function below it. Here’s what each part means:
- get — means this endpoint responds to GET requests (the most common type — used when you visit a URL in your browser).
- / is the root or home of your website (like when you visit google.com — you’re visiting /).
Below decorator is a regular Python function. The name read_root is just a descriptive name — you could call it anything. FastAPI doesn’t care about the function name; it only cares about the decorator. This function returns a Python dictionary.
Running the API Server
Now that we’ve written the code, let’s run it! Open your terminal (make sure you’re in the same folder as main.py) and run:
# Run the server in your terminal
# The format is: uvicorn <filename>:<app_instance> --reload
!uvicorn main:app --reload
- uvicorn: Command to start the ASGI server.
- main: Name of your Python file (main.py).
- app: Name of your FastAPI instance.
- reload: Flag that tells uvicorn to automatically restart the server whenever you change the code. This is only for development — remove it in production.
What You’ll See in the Terminal
When the server starts successfully, you’ll see something like:
INFO: Uvicorn running on http://127.0.0.1:8000 (Press CTRL+C to quit)
INFO: Started reloader process [12345]
INFO: Started server process [12346]
INFO: Waiting for application startup.
INFO: Application startup complete.
Testing Your API
Open your browser and go to: http://127.0.0.1:8000
You should see:
{"message": "Hello World"}Congratulations! 🎉 You just built and ran your first API!
Interactive API Documentation (Swagger UI)
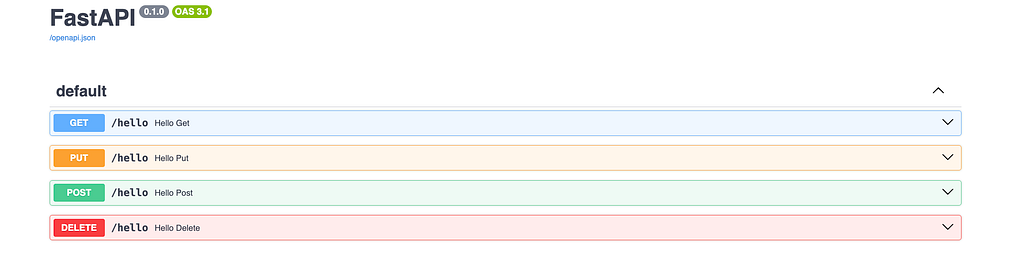
This is where FastAPI truly shines — automatic, interactive API documentation. While your server is still running, open a new browser tab and visit:
http://127.0.0.1:8000/docs
You’ll see an interactive documentation page generated automatically by FastAPI. This is called Swagger UI.
What Can You Do with Swagger UI?
- See all your endpoints — every URL your API responds to is listed with its HTTP method.
- Test endpoints directly — click Try it out and send requests without writing any code.
- See request/response schemas — understand what data each endpoint expects and returns.
- See status codes — know what status code each endpoint returns.
- Share with your team — this documentation is accessible to anyone with the URL.
Alternative Documentation: ReDoc
FastAPI also provides another documentation style called ReDoc. Visit:
http://127.0.0.1:8000/redoc
ReDoc has a cleaner, more readable layout that’s great for reading documentation rather than testing. It’s organized by tags and has a three-panel layout (navigation, content, examples).
- Use Swagger UI when you need to test and interact with your API.
- Use ReDoc when you want to browse and understand the API structure.
How to Test Different Methods
- Swagger UI (easiest way): Go to http://127.0.0.1:8000/docs and click on the endpoint you want to test, then Try it out and Execute.
- curl (command line tool):
# Send a POST request
curl -X POST http://127.0.0.1:8000/hello

# Send a PUT request
curl -X PUT http://127.0.0.1:8000/hello

# Send a DELETE request
curl -X DELETE http://127.0.0.1:8000/hello
- Postman (graphical API testing tool): A popular desktop app that lets you test APIs with a nice user interface.
Same URL, Different Methods
Notice that all four endpoints above use the same URL (/hello) but different HTTP methods. This is perfectly fine — and it’s how REST APIs are designed. The HTTP method tells the server what action the client wants to perform.
Path Parameters: Dynamic URLs
Sometimes you want URLs that change based on the data. For example:
- /users/1 — get user with ID 1
- /users/42 — get user with ID 42
- /products/laptop — get the laptop product
In FastAPI, you create these dynamic URLs by putting a variable name inside curly braces `{}` in the path:
from fastapi import FastAPI

app = FastAPI()

# The {user_id} in the URL is called a "path parameter"
# FastAPI will extract whatever value is at that position and pass it to the function
@app.get("/users/{user_id}")
def get_user(user_id: int):
    return {
        "user_id": user_id,
        "message": f"You are viewing user profile #{user_id}"
    }
How It Works:
- When you visit http://127.0.0.1:8000/users/42, FastAPI looks at the URL pattern /users/{user_id} and extracts 42 from the URL
- It looks at your function parameter definition: user_id: int
- FastAPI automatically converts the string 42 (from the URL) to the integer 42
- If you visit /users/abc, FastAPI will return a validation error because abc can’t be converted to an integer.
Query Parameters: Filtering and Modifying Data
Query parameters are extra key-value pairs sent after a ? in the URL. They’re commonly used for:
- Filtering — ?category=electronics
- Sorting — ?sort=price&order=asc
- Pagination — ?page=2&limit=20
- Searching — ?q=python
Example URLs with query parameters:
- http://example.com/search?q=python
- http://example.com/users?age=25&city=Jakarta
- http://example.com/products?page=1&limit=10&sort=price
In FastAPI, you don’t need to do anything special to read query parameters — just add parameters to your function that aren’t in the path:
from fastapi import FastAPI

app = FastAPI()

# Dummy data
users = [
    {"id": 1, "name": "Alice", "age": 25, "city": "Jakarta"},
    {"id": 2, "name": "Bob", "age": 30, "city": "Bandung"},
    {"id": 3, "name": "Charlie", "age": 22, "city": "Jakarta"},
    {"id": 4, "name": "Diana", "age": 28, "city": "Surabaya"},
]


@app.get("/users")
def get_users(age: int = None, city: str = None):
    """
    Returns users, optionally filtered by age and/or city.
    Both parameters are optional (they have default values of None).
    """
    result = users

    if age is not None:
        result = [u for u in result if u["age"] == age]

    if city is not None:
        result = [u for u in result if u["city"].lower() == city.lower()]

    return {
        "users": result,
        "count": len(result),
        "filters_applied": {
            "age": age,
            "city": city
        }
    }
How to Test Query Parameters:
Open your browser and try these URLs:
- http://127.0.0.1:8000/users
- http://127.0.0.1:8000/users?age=25
- http://127.0.0.1:8000/users?city=Jakarta
- http://127.0.0.1:8000/users?age=22&city=Jakarta
- http://127.0.0.1:8000/users?city=Bogor
How FastAPI Determines Query Parameters:
FastAPI is smart about figuring out what’s what:
1. Parameters that match a path segment `{…}` → path parameters
2. Parameters that don’t match any path segment → query parameters
Request Body: Sending Data to Your API
When you want to create or update data, you need to send data to the API. This data goes in the request body — the payload of the HTTP request. Unlike query parameters (which appear in the URL), the request body is sent separately in the HTTP message.
To define what data your API expects, FastAPI uses Pydantic models. Pydantic is a Python library for data validation that integrates seamlessly with FastAPI.
from fastapi import FastAPI
from pydantic import BaseModel

app = FastAPI()


# Step 1: Define a Pydantic model — this describes what data we expect
class User(BaseModel):
    name: str           # Required — must be a string
    age: int            # Required — must be an integer
    email: str          # Required — must be a string
    is_active: bool = True  # Optional — defaults to True if not provided


# Step 2: Use the model in your endpoint
@app.post("/users")
def create_user(user: User):
    return {
        "message": f"User {user.name} created successfully!",
        "user_data": user
    }
What’s Happening Under the Hood?
- We define a User class that inherits from BaseModel (Pydantic’s base class). This class describes the data our API expects.
- Each field has a type hint:
- name: str — name must be a string
- age: int — age must be an integer
- email: str — email must be a string
- is_active: bool = True — is_active must be a boolean, and if not provided, it defaults to True
Testing via Swagger UI:
- Go to http://127.0.0.1:8000/docs
- Click on POST /users to expand it
- Click Try it out
- You’ll see a JSON editor in the Request body section. Modify it:
{
"name": "Alice",
"age": 25,
"email": "[email protected]"
}
5. Click Execute — you’ll see the response below
Error Handling: Returning Proper Error Responses
A well-designed API returns clear, meaningful error messages when something goes wrong. In FastAPI, you use HTTPException to return standardized error responses.
from fastapi import FastAPI, HTTPException

app = FastAPI()

# Our "database" — a dictionary of items
items = {
    1: {"name": "Laptop", "price": 999, "in_stock": True},
    2: {"name": "Mouse", "price": 25, "in_stock": True},
    3: {"name": "Keyboard", "price": 75, "in_stock": False},
}


@app.get("/items/{item_id}")
def get_item(item_id: int):
    """
    Get a specific item by its ID.
    If the item doesn't exist, return a 404 error with a helpful message.
    """
    if item_id not in items:
        # Raise an HTTPException — FastAPI catches this and returns a proper JSON response
        raise HTTPException(
            status_code=404,
            detail=f"Item with ID {item_id} was not found. Available IDs: {list(items.keys())}",
            # You can also add custom headers to the response
            headers={"X-Error": "Item Not Found"}
        )

    return items[item_id]
What is an HTTPException?
HTTPException is a special exception class in FastAPI. When you raise it (using Python’s raise keyword), FastAPI catches it and automatically converts it to a proper JSON response with the appropriate status code.
Let’s look at the parameters:
- status_code: HTTP status code to return.
- detail: Error message to show the client.
- headers: Optional custom headers.
Complete Example: Building a Todo List API
Now let’s put everything together and build a complete mini application — a Todo List API. This combines all the concepts we’ve learned so far. Create new python script app.py with this code:
from fastapi import FastAPI, HTTPException
from pydantic import BaseModel
from typing import List, Optional

app = FastAPI(
    title="My Todo API",
    description="A simple todo list API built with FastAPI",
    version="1.0"
)


# ============================================
# DATA MODELS (Pydantic Schemas)
# ============================================

class TodoCreate(BaseModel):
    """Schema for creating a new todo.
    This defines what data the client must send."""
    title: str
    description: Optional[str] = None  # Optional field


class TodoUpdate(BaseModel):
    """Schema for updating an existing todo.
    All fields are optional so the client can update only what they want."""
    title: Optional[str] = None
    description: Optional[str] = None
    done: Optional[bool] = None


class TodoResponse(BaseModel):
    """Schema for returning a todo to the client.
    This is what the API will respond with."""
    id: int
    title: str
    description: Optional[str] = None
    done: bool = False


# ============================================
# IN-MEMORY DATABASE
# ============================================
# For learning purposes, we use a Python list to store todos.
# The data lives in RAM — it's temporary and will be lost when the server restarts.
# In production, you'd use a real database (PostgreSQL, MySQL, SQLite).

todos: List[TodoResponse] = [
    TodoResponse(id=1, title="Learn FastAPI", description="Complete the basics tutorial", done=False),
    TodoResponse(id=2, title="Build a project", description="Apply what I learned", done=False),
]
next_id = 3  # Auto-increment counter for assigning IDs to new todos


# ============================================
# ENDPOINTS
# ============================================

@app.get("/")
def read_root():
    return {"Welcome to ToDo list app"}


@app.get("/todos", response_model=List[TodoResponse])
def get_all_todos():
    """
    Returns all todos.
    GET /todos
    """
    return todos


@app.get("/todos/{todo_id}", response_model=TodoResponse)
def get_todo(todo_id: int):
    """
    Returns a specific todo by its ID.
    GET /todos/1, GET /todos/2, etc.
    """
    for todo in todos:
        if todo.id == todo_id:
            return todo
    raise HTTPException(status_code=404, detail=f"Todo with ID {todo_id} not found")


@app.post("/todos", response_model=TodoResponse, status_code=201)
def create_todo(todo: TodoCreate):
    """
    Creates a new todo.
    POST /todos with JSON body: {"title": "Buy milk", "description": "Go to the store"}
    """
    global next_id

    new_todo = TodoResponse(
        id=next_id,
        title=todo.title,
        description=todo.description,
        done=False  # New todos are always not done
    )
    todos.append(new_todo)
    next_id += 1
    return new_todo


@app.put("/todos/{todo_id}", response_model=TodoResponse)
def update_todo(todo_id: int, todo_data: TodoUpdate):
    """
    Updates an existing todo.
    PUT /todos/1 with JSON body: {"title": "New title", "done": true}
    All fields are optional — only provided fields will be updated.
    """
    for todo in todos:
        if todo.id == todo_id:
            # Only update fields that were actually provided
            if todo_data.title is not None:
                todo.title = todo_data.title
            if todo_data.description is not None:
                todo.description = todo_data.description
            if todo_data.done is not None:
                todo.done = todo_data.done
            return todo
    raise HTTPException(status_code=404, detail=f"Todo with ID {todo_id} not found")


@app.delete("/todos/{todo_id}", status_code=204)
def delete_todo(todo_id: int):
    """
    Deletes a todo.
    DELETE /todos/1
    Returns 204 No Content on success.
    """
    for i, todo in enumerate(todos):
        if todo.id == todo_id:
            todos.pop(i)
            return  # 204 status means no response body
    raise HTTPException(status_code=404, detail=f"Todo with ID {todo_id} not found")
How to Test the Complete Todo API
Start the server and open http://127.0.0.1:8000/docs.
1. Get All Todos (GET)
- Click GET /todos → Try it out → Execute
- You’ll see the two default todos in the response
2. Get a Specific Todo (GET with path parameter)
- Click GET /todos/{todo_id} → Try it out
- Enter 1 as the todo_id → Execute
- You’ll see only todo #1
3. Create a New Todo (POST with request body)
- Click POST /todos` → Try it out
- Enter this JSON:
{
"title": "Buy groceries",
"description": "Milk, eggs, bread, butter"
}
- Execute → You’ll get back the new todo with id: 3 and status 201 Created
4. Update a Todo (PUT with path parameter + request body)
- Click PUT /todos/{todo_id} → Try it out
- Enter 1 as the todo_id
- Enter this JSON:
{
"done": true
}
- Execute → Todo #1 is now marked as done
5. Delete a Todo (DELETE)
- Click DELETE /todos/{todo_id} → Try it out
- Enter 2 as the todo_id → Execute
- The response is empty (status 204 No Content), and todo #2 is removed
Part 1: Complete
All code can be found here
Congratulations! you have completed Part 1, There will be 2 Parts (Intermediate and Advanced) articles will be releasing soon.
Part 1: Introduction to FastAPI was originally published in Level Up Coding on Medium, where people are continuing the conversation by highlighting and responding to this story.