A step-by-step guide to isometric projection, coordinate conversion, and hover detection — building the foundation for a city builder game

Welcome back! 👋
In my last article, I spoke about core concepts of game development (the game loop and the draw and update functions) and we built a small idle game from scratch with Python and Pygame. Now we’re going to take it a step further and do something more visual by applying isometric rendering.
Remember that I’m building a game called Buildings — it’s a city builder. I’ll soon write a whole article about game design and city builders, but to keep it short: the core mechanics of a city builder are pretty simple. You place buildings on a map, they generate resources (for example, population), and you expand your city.
But before I can add buildings or build out the economy systems, I need a map to place them on, right? To draw the map, we’re going to use isometric rendering — a technique that shows depth and elevation by faking 3D with 2D tricks. It’s the technique used in games like SimCity, Age of Empires, and Civilization.
In this article, we’re going to build an isometric tile renderer from scratch. By the end, you’ll have a 10x10 grid of tiles on screen, and you’ll be able to hover over them with your mouse. No buildings yet — just the foundation. But I can promise they’re coming, and you’ll learn how to handle that very soon 🙂.
But first, let me give you some theory!

What is Isometric 3D?
Isometric projection is a way to display a 3D world on a 2D screen and you do that without actually rendering 3D graphics.
In a true 3D game, you have a camera in 3D space, objects with depth and perspective: things farther away look smaller. Think about Minecraft, for example, or any modern first-person game. On the contrary, in a top-down 2D game, you’re looking straight down from above. Everything is flat. Think the original Legend of Zelda, or Stardew Valley. No depth, no elevation.
Isometric sits in between. You’re viewing the world at a fixed angle, usually at a fixed 30-degree angle from the ground. It gives you the illusion of depth and height, but without the complexity of real 3D rendering. It’s a 2D trick that looks 3D. A lot of the first games I played were using isometric rendering. Baldur’s Gate 2 and Fallout 2 were perfect examples of that.
It’s a technique that tends to be very popular in strategy and city-building games, because:
- It shows elevation and structure clearly. You can see buildings from the side and from above at the same time.
- It’s cheap to render. You’re just drawing flat sprites in the right order. There is no 3D engine, no lighting calculations, and no camera perspective.
- It scales well. You can have hundreds of tiles on screen without killing performance. And since Pygame only runs on the CPU, it’s really important here!
The trade-off here is that you lose camera control. The viewing angle is fixed. You can’t rotate the camera or look at the world from different perspectives (or at least not without redrawing everything). For Buildings (and the game we are going to make together), it’s fine. I want a clean and readable city layout.
That being said, before we start drawing the isometric grid, we’re going to draw a 10x10 grid from above.

Drawing a top-down grid
We could start directly with isometric rendering, but I think it’s more interesting to build it step by step.
So let’s begin with something simpler: a grid viewed from above. Each tile is a square on the map. It has two coordinates: gx (grid x) and gy (grid y). Tile (0, 0) is top-left, tile (9, 9) is bottom-right. Simple, integer-based positions.
Don’t forget to create a virtual environment and/or execute your code in the app.py you used in the last article. Also, if you get lost at some point, don’t hesitate to check the repository I created for this tutorial, look for 02_isometric_rendering/top_down_app.py. If you have any questions doing that, leave a comment and I’ll be happy to answer.
Here’s the code to draw a 10x10 grid of squares:
import sys
import pygame

pygame.init()

SCREEN_WIDTH = 800
SCREEN_HEIGHT = 600
TILE_SIZE = 40
GRID_SIZE = 10

screen = pygame.display.set_mode((SCREEN_WIDTH, SCREEN_HEIGHT))
pygame.display.set_caption("Top-Down Grid")
clock = pygame.time.Clock()

def draw_tile_topdown(
    surface: pygame.Surface,
    gx: int,
    gy: int,
    color: tuple[int, int, int]
) -> None:
    x = gx * TILE_SIZE + 200  # offset to center the grid
    y = gy * TILE_SIZE + 100

    rect = pygame.Rect(x, y, TILE_SIZE, TILE_SIZE)
    pygame.draw.rect(surface, color, rect)
    pygame.draw.rect(surface, (0, 0, 0), rect, 1)  # border

running = True
while running:
    for event in pygame.event.get():
        if event.type == pygame.QUIT:
            running = False

    screen.fill((30, 30, 30))

    # Draw all tiles
    for gx in range(GRID_SIZE):
        for gy in range(GRID_SIZE):
            draw_tile_topdown(screen, gx, gy, (100, 150, 100))

    pygame.display.flip()
    clock.tick(60)

pygame.quit()
sys.exit()
Run this and you’ll see a grid of green squares. Nothing fancy, but it works.
For your information, the draw_tile_topdown function converts grid coordinates to screen coordinates: it takes (gx, gy) and calculates where on the screen to draw the tile. That's grid → screen.
How to add a hover effect?
Now let’s add hover. We want to highlight the tile under the mouse cursor. To do that, we need to figure out which tile the mouse is hovering over:
def get_tile_at_mouse(mouse_x: int, mouse_y: int) -> tuple[int, int] | None:
    # Reverse the calculation from draw_tile_topdown
    gx = (mouse_x - 200) // TILE_SIZE
    gy = (mouse_y - 100) // TILE_SIZE

    if 0 <= gx < GRID_SIZE and 0 <= gy < GRID_SIZE:
        return gx, gy
    return None

# Then there is the rest of the code
running = True
Remember what I said about the draw_tile_topdown function? We now need to do the opposite: we have a mouse position on the screen (mouse_x, mouse_y), and we want to know which tile that corresponds to. That's screen → grid. So get_tile_at_mouse reverses the math from draw_tile_topdown, that means subtracting the offset and dividing by the tile size instead of multiplying.
This pattern of converting back and forth between coordinate systems is something you'll see constantly in game development, especially when dealing with cameras, zoom, and isometric grids.
Finally, in the main loop, we check if the mouse is over a tile:
mouse_x, mouse_y = pygame.mouse.get_pos()
hovered_tile = get_tile_at_mouse(mouse_x, mouse_y)

# Draw all tiles
for gx in range(GRID_SIZE):
    for gy in range(GRID_SIZE):
        color = (100, 150, 100)

        if hovered_tile and hovered_tile == (gx, gy):
            color = (150, 200, 150)  # lighter green for hover

        draw_tile_topdown(screen, gx, gy, color)

pygame.display.flip()
# [...]
How about performance?
Drawing 100 squares (10x10 grid) with pygame.draw.rect is nothing. Even on older machines, this runs at a solid 60 FPS. The bottleneck in Pygame isn’t the drawing, it’s when you start having thousands of objects, complex collision checks, or heavy image blitting. For now, we’re fine!
Now that we have a grid, let’s implement the isometric projection.
Adding Isometric Projection
To transform our flat grid into an isometric view, we need to make some adjustements. Instead of placing tiles where each tile is at, via gx * TILE_SIZE and gy * TILE_SIZE we used before, we’re going to use a different formula that skews the grid diagonally. That formula is grid_to_iso.
Here’s the code:
TILE_WIDTH = 64
TILE_HEIGHT = 32

def grid_to_iso(gx: int, gy: int) -> tuple[int, int]:
    """
    Convert grid coordinates into isometric coordinates
    """
    x = (gx - gy) * (TILE_WIDTH / 2)
    y = (gx + gy) * (TILE_HEIGHT / 2)

    return int(x), int(y)
Let’s break down what’s happening here:
- TILE_WIDTH and TILE_HEIGHT define the size of one isometric tile. A common ratio is 2:1 : the tile is twice as wide as it is tall. That’s what gives you the classic diamond shape.
- (gx — gy) determines the horizontal position. When you move right in the grid (gx increases), you move right on screen. When you move down in the grid (gy increases), you move left on screen. That’s the isometric skew.
- (gx + gy) determines the vertical position. Moving right OR down in the grid both move you down on the screen.
- The / 2 is there because each tile spans half its width/height on each axis. That’s the geometry of the diamond.
From squares to diamonds
Now that we can convert grid positions to isometric positions, we need to change how we draw the tiles. Instead of drawing squares with pygame.draw.rect, we’re going to draw diamond-shaped tiles using 4 corner points with pygame.draw.polygon.
Here’s the updated drawing function:
def draw_tile_iso(
    surface: pygame.Surface,
    gx: int,
    gy: int,
    color: tuple[int, int, int]
) -> None:
    iso_x, iso_y = grid_to_iso(gx, gy)

    # Center the grid on screen
    cx = iso_x + SCREEN_WIDTH // 2
    cy = iso_y + 200

    # Calculate the 4 corners of the diamond
    top = (cx, cy - TILE_HEIGHT / 2)
    right = (cx + TILE_WIDTH / 2, cy)
    bottom = (cx, cy + TILE_HEIGHT / 2)
    left = (cx - TILE_WIDTH / 2, cy)

    pygame.draw.polygon(surface, color, [top, right, bottom, left])
    pygame.draw.polygon(surface, (0, 0, 0), [top, right, bottom, left], 1)  # border
And in the main loop, replace draw_tile_topdown with draw_tile_iso:
# Draw all tiles
for gx in range(GRID_SIZE):
    for gy in range(GRID_SIZE):
        draw_tile_iso(screen, gx, gy, (100, 150, 100))
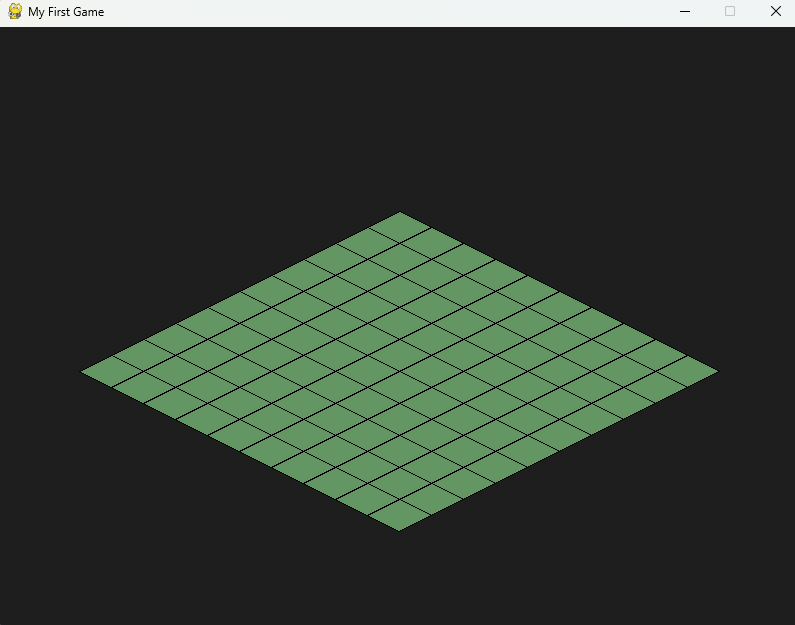
Run this and your flat grid is now isometric. The tiles are diamonds, and the grid looks like it has depth.
How about performance?
The grid_to_iso function does two subtractions, two additions, and two multiplications per tile. That’s it. Even for 1000 tiles, this won’t slow you down. Drawing the polygons with pygame.draw.polygon is slightly more expensive than pygame.draw.rect, but still negligible for a 10x10 grid. You’ll still be running at 60 FPS without any issues.
One problem though: if you move your mouse over the grid, you’ll notice the hover doesn’t work anymore. That’s because get_tile_at_mouse is still using the top-down calculation. We need to implement the reverse of grid_to_iso and that’s what we’ll do in the next section.
Hover with screen_to_grid
For your information, screen_to_grid is going to be the reverse of grid_to_iso.
def screen_to_grid(
    screen_x: int,
    screen_y: int
) -> tuple[int, int]:
    """
    Convert screen coordinates to grid coordinates (isometric)
    """
    # Remove the centering offset
    x = screen_x - SCREEN_WIDTH // 2
    y = screen_y - 200

    # Reverse the isometric projection formula
    gx = (y / (TILE_HEIGHT / 2) + x / (TILE_WIDTH / 2)) / 2
    gy = (y / (TILE_HEIGHT / 2) - x / (TILE_WIDTH / 2)) / 2

    return int(gx), int(gy)
I know that it can look more complicated than grid_to_iso, but it’s “just” the algebraic inverse.
If you remember from grid_to_iso:
x = (gx - gy) * (TILE_WIDTH / 2)
y = (gx + gy) * (TILE_HEIGHT / 2)
We’re solving for gx and gy given x and y. That gives us:
gx = (y / (TILE_HEIGHT / 2) + x / (TILE_WIDTH / 2)) / 2
gy = (y / (TILE_HEIGHT / 2) - x / (TILE_WIDTH / 2)) / 2
Once again, it’s “just” algebra. The most important part here is that it works. You give it a screen position, and it tells you which tile you’re hovering over.
Adding hover back
Now let’s add the hover back. In the drawing section:
mouse_x, mouse_y = pygame.mouse.get_pos()
gx, gy = screen_to_grid(mouse_x, mouse_y)

hovered_tile = None
if 0 <= gx < GRID_SIZE and 0 <= gy < GRID_SIZE:
    hovered_tile = (gx, gy)

# Draw all tiles
for gx in range(GRID_SIZE):
    for gy in range(GRID_SIZE):
        color = (100, 150, 100)

        if hovered_tile and hovered_tile == (gx, gy):
            color = (150, 200, 150)  # lighter green for hover

        draw_tile_iso(screen, gx, gy, color)
Note that we calculate screen_to_grid once before the loop, not inside it. The mouse position doesn’t change between iterations, so there’s no need to recalculate it 100 times. We check if the result is within grid bounds to avoid highlighting tiles that don’t exist.
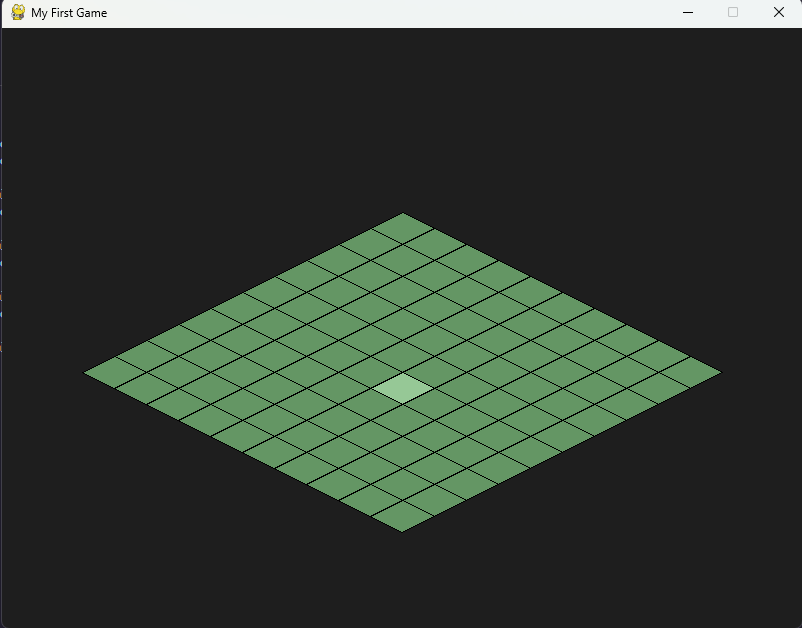
Run this and move your mouse over the grid. The tile under your cursor lights up.
How about performance?
The screen_to_grid function involves divisions, which are slightly more expensive than multiplications. But we’re only calling it once per frame (for the mouse position), not once per tile. So the cost is negligible. Even on older machines, this won’t affect your framerate. You now have a fully functional isometric grid with hover.
Let’s take a step back and look at what we built today.
We started with a simple top-down grid (just squares on a screen). Then we applied isometric projection, and suddenly our flat grid had depth. Finally, we implemented the reverse math to make hover work again.
Along the way, we covered concepts that go way beyond this specific project:
- Converting between coordinate systems (grid ↔ screen)
- Isometric projection and why it’s useful for strategy games
- Performance considerations when rendering tiles
- Building features step by step with visual feedback at each stage
These concepts aren’t specific to Pygame or even to Python. You’ll find them in Unity, Godot, and pretty much every other game engine.
In the next article, we’ll make this grid look like an actual map. We’ll add terrain types (grass, water, forest), generate biomes, and turn this blank grid into something that feels like a world. No buildings yet — but we’re getting closer.
The full code for this article is available on GitHub — check out 02_isometric_rendering/ for the complete implementation. You’ll find two files: one for the top down version and the other for the isometric.
If you enjoyed this article, don’t hesitate to leave a comment or clap — it helps with visibility on Medium and motivates me to keep writing this series.
See you in the next one.
How to Render Isometric Grids with Python and Pygame was originally published in Level Up Coding on Medium, where people are continuing the conversation by highlighting and responding to this story.
