
1. Introduction to Claude Code
What is Claude Code?
Claude Code is an agentic coding tool developed by Anthropic that lives in your terminal, understands your codebase, and helps you code faster. Unlike traditional AI assistants that simply answer questions and wait for your next prompt, Claude Code can autonomously read your files, run commands, make changes, and work through complex problems while you watch, redirect, or step away entirely.
Think of Claude Code as having a highly capable junior developer working alongside you. You describe what you want in plain language, and Claude Code figures out how to build it. It explores your codebase, plans the approach, implements the solution, and verifies it works — all through natural language commands.
Claude Code is available across multiple platforms including Terminal CLI, VS Code extension, JetBrains IDEs, Desktop app, Web browser, and even Slack integration.
Why Claude Code for React Developers?
For React.js developers, Claude Code offers tremendous value by automating routine tasks and accelerating development workflows:
- Component Generation — Describe a component in plain language and Claude builds it with proper TypeScript types, hooks, and styling
- Debugging — Paste an error message and Claude traces it through your codebase, identifies the root cause, and implements a fix
- Testing — Claude can write comprehensive unit tests, integration tests, and fix failing tests automatically
- Refactoring — Modernize legacy code, convert class components to hooks, or restructure your project architecture
- Git Operations — Claude handles commits, branches, PRs, and merge conflicts through natural language
- Documentation — Generate JSDoc comments, README files, and API documentation from your code
Claude Code vs Traditional AI Assistants
Understanding how Claude Code differs from traditional AI coding assistants helps you leverage its full potential:

Prerequisites and Requirements
Before installing Claude Code, ensure you have the following:
- Node.js 18+ — Required for the CLI. Check with: node --version
- Git — For version control integration. Windows users need Git for Windows
- Terminal/Command Prompt — Any modern terminal emulator works
- A Code Project — A React project or any codebase to work with
- Claude Account — Pro, Max, Teams, Enterprise subscription, or Console account
💡 Tip: If you’re new to the terminal, Claude Code documentation includes a helpful terminal guide. Don’t worry — the commands are straightforward, and Claude itself can help you learn!
Pricing and Plans
Claude Code is included with Claude subscriptions. Here are your options:
- Claude Pro ($20/month) — Perfect for short coding sprints in small codebases with access to both Sonnet and Opus models
- Claude Max ($100/month) — Great value for everyday use in larger codebases with more generous usage limits
- Claude Max ($200/month) — Power user tier with the most access to Claude models
- API Pay-as-you-go — Standard Claude API pricing with no per-seat fees, ideal for teams
2. Installation & Setup
Installing Claude Code on macOS/Linux
The recommended installation method uses the native installer, which automatically keeps Claude Code updated in the background. Open your terminal and run:
# Native installation (recommended)
curl -fsSL https://claude.ai/install.sh | bash
After installation completes, you can start Claude Code immediately by running:
# Navigate to your project
cd your-react-project

# Start Claude Code
claude
Installing Claude Code on Windows
Windows users have two options depending on their terminal. First, ensure you have Git for Windows installed (download from git-scm.com if needed).
For PowerShell:
# Run in PowerShell (look for PS C:\ prompt)
irm https://claude.ai/install.ps1 | iex
For Command Prompt (CMD):
# Run in CMD (look for C:\ prompt without PS)
curl -fsSL https://claude.ai/install.cmd -o install.cmd
install.cmd && del install.cmd
💡 Tip: If you see 'The token '&&' is not a valid statement separator', you're in PowerShell, not CMD. Your prompt shows PS C:\ when in PowerShell. Use the PowerShell command instead.
Alternative Installation Methods
If you prefer package managers, Claude Code is also available through Homebrew and WinGet. Note that these methods do not auto-update.
Using Homebrew (macOS):
# Install via Homebrew
brew install --cask claude-code

# Update manually when needed
brew upgrade claude-code
Using WinGet (Windows):
# Install via WinGet
winget install Anthropic.ClaudeCode

# Update manually when needed
winget upgrade Anthropic.ClaudeCode
Logging In and Authentication
When you first run claude, you'll be prompted to log in. Claude Code supports multiple authentication methods:
- Claude Pro/Max/Teams/Enterprise — Recommended for most users, provides seamless access
- Claude Console (API) — Uses pre-paid credits, auto-creates a ‘Claude Code’ workspace for cost tracking
- Third-party Providers — Amazon Bedrock, Google Vertex AI, or Microsoft Foundry for enterprise
# Start Claude Code (prompts for login on first use)
claude

# Or explicitly log in
/login
Your credentials are stored securely on your system, so you won’t need to log in again. To switch accounts later, use the /login command.
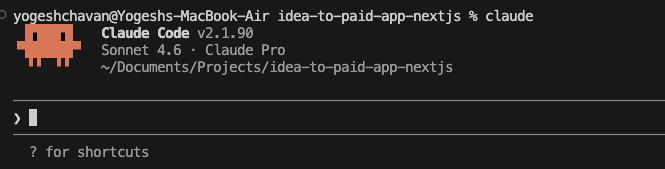
Starting Your First Session
Navigate to any React project directory and start Claude Code:
cd /path/to/your/react-project

claude
You’ll see the Claude Code welcome screen with your session information, recent conversations, and latest updates.
Try these first commands to explore:
# Ask about your codebase
what does this project do?

# Get help
/help

# See available commands
?
3. Core Concepts
Understanding the Agentic Loop
Claude Code operates through an ‘agentic loop’ — a cycle where Claude receives your request, decides what actions to take, executes them, observes results, and continues until the task is complete or needs your input. This is fundamentally different from simple question-answer AI.
Here’s how the agentic loop works:
- Receive Request — You describe what you want in natural language
- Analyze & Plan — Claude examines your codebase and determines what needs to be done
- Execute Action — Claude uses tools (read files, run commands, edit code)
- Observe Results — Claude sees the output and evaluates success
- Iterate or Complete — Claude continues fixing issues or reports completion
This loop continues autonomously until Claude completes the task, encounters an error, or needs permission for a potentially risky action. You can interrupt at any time with Esc.
The Context Window Explained
The context window is Claude’s working memory — it holds everything Claude knows about the current conversation including your messages, files read, command outputs, and Claude’s responses. Claude’s context window is approximately 200,000 tokens.
Understanding context is crucial because:
- Performance can degrade as context fills up — Claude may forget earlier instructions
- Each file read and command output consumes tokens
- Use /clear between unrelated tasks to reset context
- Use /compact to summarize and free space during long sessions
💡 Tip: Context management is the single most important skill for effective Claude Code usage. Clear your context between unrelated tasks, and be specific to avoid Claude reading unnecessary files.
Permission Modes
Claude Code has three permission modes that control how much autonomy Claude has:
- Normal Mode — Default mode. Claude asks permission for file writes, bash commands, and other potentially risky actions. Safe but requires more interaction.
- Auto Mode — A classifier reviews commands and blocks risky ones, while allowing routine operations to proceed. Use Shift+Tab to toggle.
- Plan Mode — Claude only reads and analyzes code, never modifies anything. Perfect for exploration and planning complex changes safely.
Built-in Tools
Claude Code comes with powerful built-in tools that it uses automatically:
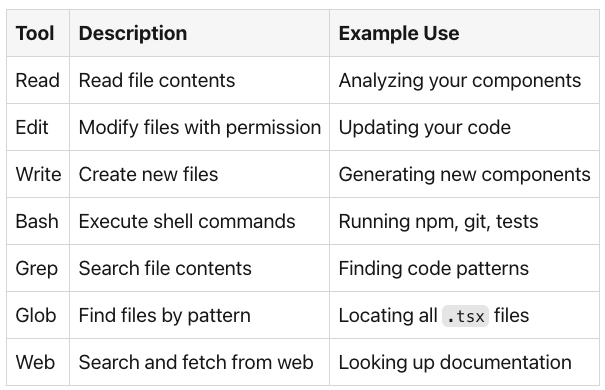
You don’t need to explicitly invoke these tools — Claude uses them automatically based on what your request requires. For example, asking “add a button to the Header component” triggers Claude to read the Header file, edit it, and potentially run your linter.
4. Basic Commands & Usage
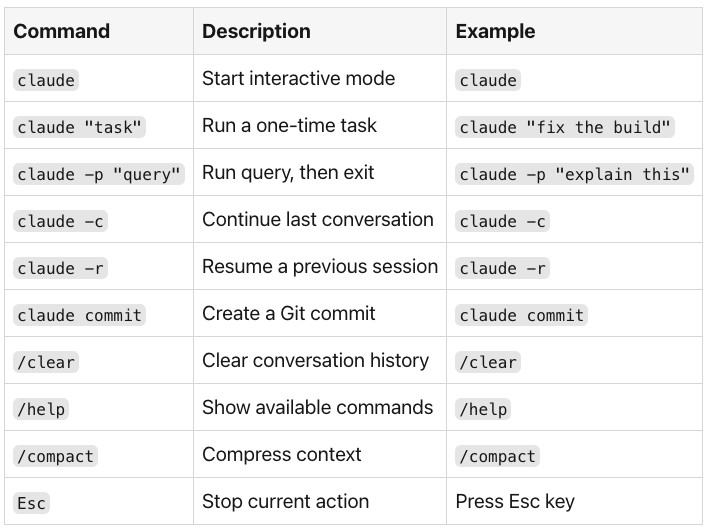
Essential CLI Commands
These are the most important commands for daily use with Claude Code:
Interactive vs Non-Interactive Mode:
# Interactive mode - start a conversation
claude

# Non-interactive mode - single task
claude -p "list all React components in src/"

# Continue most recent conversation
claude --continue

# Resume specific session by name
claude --resume auth-refactor
Exploring Your Codebase
When you join a new project or need to understand unfamiliar code, ask Claude directly:
# Get a high-level overview
what does this project do?

# Understand the architecture
explain the main architecture patterns used here

# Find specific functionality
where is the authentication handled?

# Trace execution flow
trace the user login process from frontend to database

# Ask about specific files
explain what @src/components/Header.tsx does
💡 Tip: Use @ to reference specific files directly. For example, @src/App.tsx includes the file content immediately without Claude needing to search for it, saving context and time.
Making Code Changes
Claude Code can modify your files directly. Here’s how to make changes effectively:
# Simple addition
add a loading spinner to the UserList component

# Specific modification
add input validation to the email field in the signup form

# Bug fixes
fix the bug where clicking submit twice sends duplicate requests

# Refactoring
convert the UserCard class component to a functional component with hooks
When Claude proposes changes, it shows you a diff of what will be modified. You can:
- Accept — Allow the change and continue
- Reject — Decline and provide feedback
- Accept All — Enable auto-accept for the session
- Esc — Stop and reconsider the approach
Working with Git
Claude Code integrates seamlessly with Git for version control operations:
# Check status
what files have I changed?

# Create commits
commit my changes with a descriptive message

# Branch operations
create a new branch called feature/user-auth

# View history
show me the last 5 commits

# Handle conflicts
help me resolve the merge conflicts

# Create PRs
create a pull request for my changes
💡 Tip: Claude Code works best when you have the gh CLI installed for GitHub operations. It enables direct PR creation, issue management, and more without rate limits.
5. CLAUDE.md & Memory System
What is CLAUDE.md?
CLAUDE.md is a special markdown file that Claude reads at the start of every session. It contains persistent instructions, project conventions, and context that Claude should always know about. Think of it as onboarding documentation specifically for Claude.
You can place CLAUDE.md files in several locations:
- Project root (./CLAUDE.md) — Shared with team via Git, contains project-specific instructions
- Home folder (~/.claude/CLAUDE.md) — Personal preferences that apply to all your projects
- Child directories — Loaded when Claude works with files in those directories
Generate a starter CLAUDE.md automatically:
# Generate CLAUDE.md based on your project
/init
The /init command analyzes your codebase and creates a file with build commands, test instructions, and conventions it discovers.
Creating Effective Instructions
A well-crafted CLAUDE.md significantly improves Claude's effectiveness. Here's an example for a React project:
# Project: React Dashboard

## Commands
- npm run dev: Start development server
- npm run test: Run Jest tests
- npm run lint: Run ESLint
- npm run build: Production build

## Code Style
- Use functional components with hooks, never class components
- Use TypeScript strict mode
- Prefer named exports over default exports
- Use 2-space indentation

## Architecture
- Components in src/components/
- Hooks in src/hooks/
- API calls in src/services/
- State management with Zustand in src/stores/

## Testing
- Write tests for all new components
- Use React Testing Library, not Enzyme
- Run tests before committing
💡 Tip: Keep CLAUDE.md concise — aim for under 200 lines. Long files consume context and reduce instruction adherence. Only include information Claude can't infer from your code.
Auto Memory Feature
Auto Memory lets Claude accumulate knowledge across sessions without you writing anything. As Claude works, it saves notes for itself: build commands, debugging insights, architecture notes, and workflow habits.
Auto Memory is enabled by default and stores files in ~/.claude/projects/<project>/memory/.
# View and manage memory
/memory

# Toggle auto memory on/off
/memory  # Then use the toggle option

# Tell Claude to remember something
remember that the API tests require a local Redis instance
The first 200 lines of MEMORY.md are loaded at the start of every conversation. Claude keeps it concise by moving detailed notes into separate topic files.
Project Rules with .claude/rules/
For larger projects, organize instructions into topic-specific files in .claude/rules/. These rules can even be scoped to specific file types, giving you fine-grained control over Claude's behavior across different parts of your codebase.
Tips When Working With Claude Code
Most developers waste tokens in Claude Code without even realizing it 🙂
The #1 reason? Vague prompts that force Claude to read files it doesn’t need.
Here’s what I learned after using Claude Code for months without hitting my usage limit once 👇
🎯 Be Specific, Not Lengthy
A long prompt isn’t a good prompt. A specific prompt is.
❌ "fix the login bug"
✅ "fix the bug where users see a blank screen after entering wrong credentials in LoginForm.tsx"
The second prompt tells Claude exactly where to look. It reads fewer files, uses fewer tokens, and gives a better fix — first try.
📌 Reference Files Directly with @
Instead of describing what a file does, just write @src/components/Header.tsx.
Claude reads it immediately without scanning your entire codebase. Huge token saver.
✅ Always Give Claude a Way to Verify
"Fix the infinite loop in SearchBar" leaves Claude guessing if it worked.
"Fix the infinite loop in SearchBar and run npm test" gives Claude a way to confirm.
Verification = fewer back-and-forth messages = fewer tokens used.
🔄 Clear Context Between Unrelated Tasks
One long session mixing different tasks is the fastest way to degrade Claude’s output quality and burn tokens. Use /clear between tasks.
Fresh context = sharper responses.
🧠 Break Complex Tasks into Steps
Instead of dumping a 10-requirement prompt, break it down:
- Create the component structure
- Add TypeScript types
- Add loading and error states
- Write tests
Claude tracks progress better, and you stay in control.
Check out the video below, where I have created a multi-step form using a single prompt mentioned in the guide.
https://medium.com/media/5a5307a67df2b46f3c8378e7cafaf09d/hrefAnd There’s So Much More to Explore…
This guide has only scratched the surface. The full guide covers many more powerful topics to take your Claude Code skills to the next level:
6. Common Workflows for React Developers
- Building React Components with natural language prompts
- Debugging React Applications end-to-end
- Writing Tests automatically with Claude
- Refactoring legacy code and class components
7. Advanced Features
- Plan Mode for safely tackling complex, multi-step tasks
- Subagents to parallelize work across your codebase
- MCP (Model Context Protocol) to connect Claude to external services
- Hooks and Skills for customizing Claude’s behavior
8. Best Practices & Tips
- Effective prompting techniques for better results
- Managing context efficiently across long sessions
- Common mistakes to avoid as a beginner
9. VS Code Integration
- Installing and configuring the VS Code extension
- Working with code selections and inline editing
- Keyboard shortcuts for a faster workflow
10. Building a Complete React App
- Full project setup from scratch
- Creating data models, components, and custom hooks
- Testing and debugging with Claude alongside you
11. CI/CD Integration
- GitHub Actions and GitLab CI/CD integration
- Automated PR creation and scheduled tasks
12–16. More Advanced Topics
- API & Backend — React Query, authentication flows, custom data-fetching hooks
- State Management — Zustand, Redux Toolkit, React Context, and state migration
- Performance Optimization — Memoization, code splitting, virtual lists, and image optimization
- Troubleshooting — Installation issues, auth problems, context window gotchas
- Quick Reference & Cheat Sheet — Essential commands, shortcuts, and common React prompts
📖 To learn more and dive deep into all these topics, check out the Getting Started With Claude Code Guide — the complete resource for React developers looking to supercharge their workflow with Claude Code.
About Me
I’m a freelancer, mentor, and full-stack developer with 12+ years of experience, working primarily with React, Next.js, and Node.js.
Alongside building real-world web applications, I’m also an Industry/Corporate Trainer, training developers and teams in modern JavaScript, Next.js, and MERN stack technologies with a focus on practical, production-ready skills.
I’ve also created various courses with 3000+ students enrolled.
My Portfolio: https://yogeshchavan.dev/
Getting Started with Claude Code — A Complete Beginner’s Guide was originally published in Level Up Coding on Medium, where people are continuing the conversation by highlighting and responding to this story.


