
Like a lot of people who enter the workforce and get dropped into the lion’s den, you end up doing your job before you ever formally learn what you’re doing. I’ve worked in cloud development as a software engineer at Microsoft for the last five years, and I still remember one of the first things I tried to learn: how to provision a VM.
When I first ran through these Microsoft Learn modules as an intern, my biggest takeaway was honestly this: it’s surprisingly easy to spin up a VM if you have the right commands. Copy, paste, enter, and you’re done.
Revisiting the same modules now, I realized something: the tutorials are great at getting you to a working result quickly, but they don’t always pause to help you build a mental model. And if you’re brand new, it’s really easy to finish an exercise and still not know what happened.
So this isn’t a replacement for the official tutorial. It’s a companion.
Official tutorial I’m following (do this alongside the article): Create a virtual machine and configure as a web host
My point is simple: anyone can spin up a VM. The hard part is learning what you just did.
Step 1: Provision the VM (the easy part)
Once you set up your Azure account and create a resource group (inside your subscription) to keep things organized, you can start provisioning your VM, a virtualized computer in the cloud.
The tutorial has you open Cloud Shell (a convenient shell for interacting with your Azure environment) and run the following command:
az vm create \ — resource-group “IntroAzureRG” \ — name my-vm \ — size Standard_D2s_v5 \ — public-ip-sku Standard \ — image Ubuntu2204 \ — admin-username azureuser \ — generate-ssh-keys
This absolutely works.
It’s also extremely easy to paste it, watch it succeed, and learn nothing. Here’s what I recommend doing in addition.
Don’t Just Run It. Make It Reproducible.
This command spins up an Ubuntu VM with a standard size and SSH keys. It works, but don’t stop there.
Try creating the same VM in the Azure portal too. Most of us aren’t going to memorize this exact CLI command, and in a real job you need to be able to reproduce the setup, not just paste it once. If you’re not careful, you’re not learning here, you’re just creating.

When you use the portal, you’re forced to make decisions the CLI hides behind defaults:
- Which image do you want?
- What’s x64 vs Arm64, and why does it matter?
- Do you want SSH keys or a password?
- What even is SSH, and could you explain it if someone asked?
These are the questions we skip when we copy/paste commands and watch resources appear. It works, but it’s important to actually know what you’re doing.
Inspect What Azure Created Around Your VM
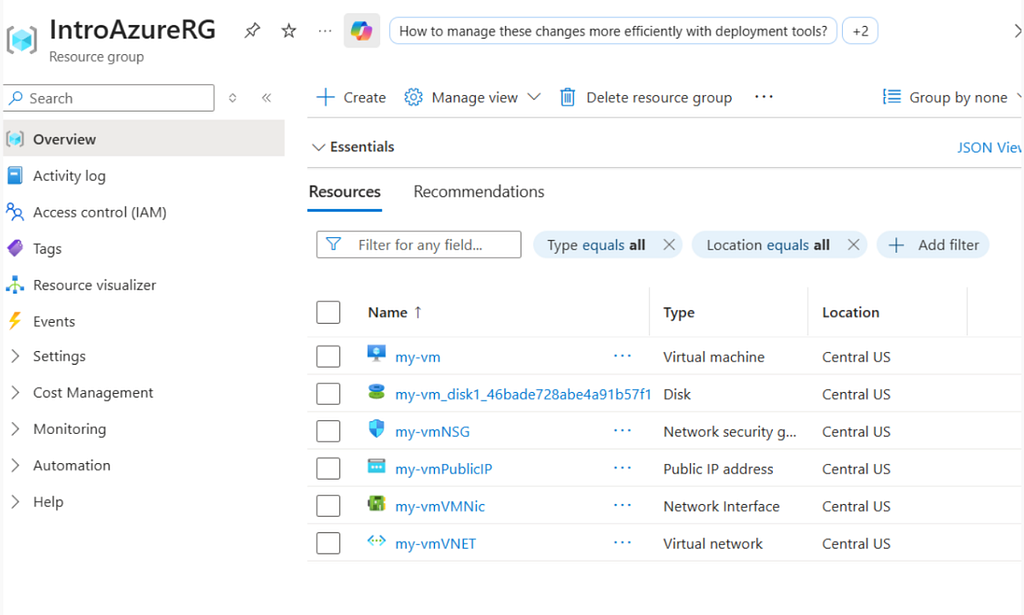
After its provisions, go into the portal and inspect what was created. Because a “VM” in Azure isn’t just a VM. It’s a small ecosystem Azure assembles so your server can exist and talk to the world.
You’ll usually see things like:
- Virtual Machine (the compute)
- NIC (network interface, where the VM gets its private IP)
- VNet + Subnet (where the VM lives)
- Public IP (vm address)
- NSG (network security group, your inbound/outbound firewall rules)
- Disk(s) (OS disk at minimum)
If those don’t make sense yet, that’s totally normal. But this is the part that turns Azure from “magic” into something you can reason about. Stop and learn the basics of what each of those resources and tools do.
Read the Logs (Yes, the Logs Matter)
Also: read the CLI output. If you used — generate-ssh-keys, Cloud Shell prints something like:
SSH key files … have been generated under ~/.ssh to allow SSH access to the VM.
That line is doing a lot of work. Azure isn’t magically “letting you in.” It’s creating a keypair locally, placing the public key on the VM, and using that as proof that you’re allowed to connect.
If you can’t explain that at a high level, it’s a sign you created a VM, but you didn’t really learn how the access works.
Step 2: Install Nginx (automation, not wizardry)
Next, the tutorial installs Nginx using a Custom Script Extension (basically: “run this script on the VM for me”):
az vm extension set \
   --resource-group "IntroAzureRG" \
   --vm-name my-vm \
   --name customScript \
   --publisher Microsoft.Azure.Extensions \
   --version 2.1 \
   --settings '{"fileUris":["https://raw.githubusercontent.com/MicrosoftDocs/mslearn-welcome-to-azure/master/configure-nginx.sh"]}' \
   --protected-settings '{"commandToExecute": "./configure-nginx.sh"}'
Yes, run it. But also internalize what just happened:
- You told Azure: “Download a script from GitHub”
- Then: “Execute it on my VM”
- The script installs Nginx and sets a basic homepage
This is one of those moments where the cloud feels like wizardry, but it’s just the magic of automation. But if you want to really make it stick, open the script in a browser and skim it, learn more about nginx and understand why it’s so useful for this simple tutorial.
Step 3: Find the Public IP (CLI and portal are the same truth)
The tutorial correctly has you fetch the VM’s public IP and store it in a variable. The full command they use is:
IPADDRESS="$(az vm list-ip-addresses \
--resource-group "IntroAzureRG" \
--name my-vm \
--query "[].virtualMachine.network.publicIpAddresses[*].ipAddress" \
--output tsv)"
This is great if you’re scripting.
But it’s also worth knowing you can find the exact same IP in the portal by clicking the Public IP resource that was created alongside your VM. Personally, I check it there because it’s faster than remembering the exact command.
Small thing, but it reinforces a bigger point: don’t treat the CLI as the only “real” view. The portal and CLI are just two windows into the same resources.

Step 4: Fix Network Access with NSG Rules
The tutorial also walks you through listing the NSG rules, then adding an inbound rule to allow port 80 (HTTP) so you can get a successful response from your nginx web server you set up in your vm. This is all good stuff.
Here’s the part I’d emphasize if you’re learning:
- Go open the NSG in the portal
- Look at the default rules
- Make your own rule (even if it’s redundant)
- Understand that rules run by priority, lowest number first
- Understand that “Allow HTTP” is literally “allow inbound TCP traffic to port 80”
This kind of learning is the difference between “I followed a lab and kind of know what NSG does” and “I can debug why something isn’t reachable.”

Bonus step (highly recommended): SSH into your VM and look around
Don’t just prove the server works from the outside. Go inside.
Since you’ve got the public IP and you know what SSH does, you can access and free reign over your vm.

Then poke around and ask yourself:
- What's the directory file system look like
- Where is Nginx installed?
- Where is the default website file?
Conclusion: Look Out for Future You
This isn’t another VM tutorial, it’s a learning tutorial.
Microsoft’s module gets you to “it works” quickly, which is great, but “it works” is not the same thing as “I understand it.”
Taking that extra 30–40 minutes to click into the resources, read the outputs, and ask “why does this exist?” is the difference between copy-pasting your way through the cloud and being able to rebuild it when you don’t have the exact command in front of you.
That struggle you might think you can avoid now will, unfortunately, show up later. You just get to choose when.
From Copy-Paste to Competent: How to Learn Azure as a Beginner was originally published in Level Up Coding on Medium, where people are continuing the conversation by highlighting and responding to this story.


