Graphics APIs and game engines make rendering look easy, but they hide most of the interesting details. I wanted to understand what actually happens under the hood, so I decided to build a small 3D renderer from scratch using C++.
By the end of this article, you’ll understand the core ideas behind ray tracing and be able to build a simple renderer yourself.
We’ll finish by rendering the image shown below, without using any graphics libraries or engines but with C++ and Maths.
Why Ray tracing
In computer graphics, there are two main rendering techniques: rasterization and ray tracing.
You might ask, what exactly is rendering? In simple terms, rendering is the process of generating a 2D image or video from a 3D model or scene. It’s considered the final stage of a 3D engine.
While rasterization is fast and used in real-time applications like games, ray tracing simulates how light behaves in the real world to produce highly realistic images, shadows, and reflections. It traces the path of light rays as they interact with objects in a 3D scene, calculating reflections, refractions, and accurate lighting effects.
Ray tracing involves some basic mathematics. Oops, I just mentioned our worst nightmare 😟 Don’t worry though, it’s not as scary as it sounds. I’ve got you. So without any further ado, let’s get started.
One drawback of ray tracing is performance. However, there are optimization techniques we can use to improve speed, which we’ll touch on other part.
The below image is generated using ray tracing algorithm

How Ray Tracing Works
Ray tracing simulates how light travels. Rays are cast from a single point in 3D space which is the camera into the scene through an imaginary viewport. Each ray corresponds to a pixel on the screen. When a ray intersects an object (like a sphere or triangle), we compute the closest intersection point to determine the final color of that pixel.
This process is repeated for every pixel, creating a complete, realistic image.
we have prepared a pipeline to render a simple shape, we will improve it as we go deeper in the subject.
- Camera → rays
- Ray → Object intersection
- Drawing a pixel on the screen
Let’s shoot some rays from the camera
A ray is similar to a line but with an important difference a line extends infinitely in both directions, while a ray starts at a specific point and extends infinitely in one direction.
Mathematically, a ray can be represented using a parametric equation

Where:
- P is any point along the ray
- O is the ray’s origin (starting point)
- d is the direction vector
- t is a scalar parameter
If t = 0, then P = O.
If t = 1, then P = O + d.
Increasing t moves the point along the ray indefinitely.
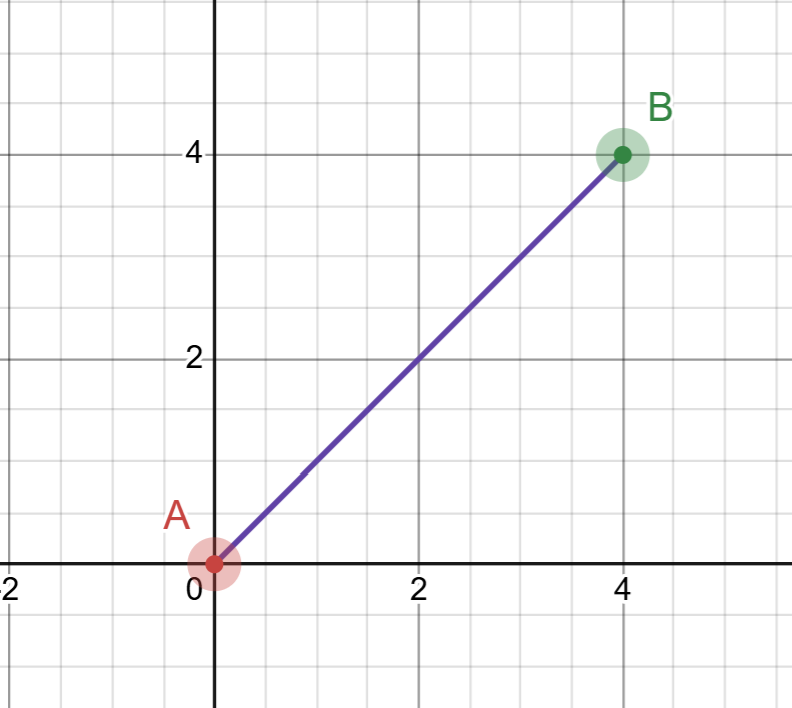
let’s say we have two points in a space “point A” and “point B”, let’s use 2D for now to better understand the above formula.
A = (0, 0) and B = (4, 4)
I will use a platform called desmos for plotting points, you can search it online

As we can see in the graph, we have two points, and we want to draw a line segment or a ray between them. A line is defined as an infinite set of points, so how can we represent the line that goes through points A and B? We use the parametric equation of a line. Before writing that equation, however, we need to determine the direction in which the line or ray is pointing. We can find this direction by subtracting point A from point B. The result is a vector, and this vector becomes the direction vector d in the parametric equation
Example:

now we have the direction, if you look closely the vector d is the same as the point B, this is when the origin starts from 0, but if it was another point in the space it would be different.
let’s plug the direction in the equation and draw our line, but there is one missing piece, the “t” right? don’t worry we don’t have to do anything for ‘t’ it has to start from 0.0 and increase it infinitly

we repeat this process and increase the value of “t” until we reach B or exceed.
as you can see here by using the equation we draw a line from A to B, here you can see that when “t” starts from 0 and reaches 1 it ends at B, this is called a line segment, but we need a ray, and to do that its very simple we set “t” to infinity or a large number would work, now we have a ray and next image shows that.
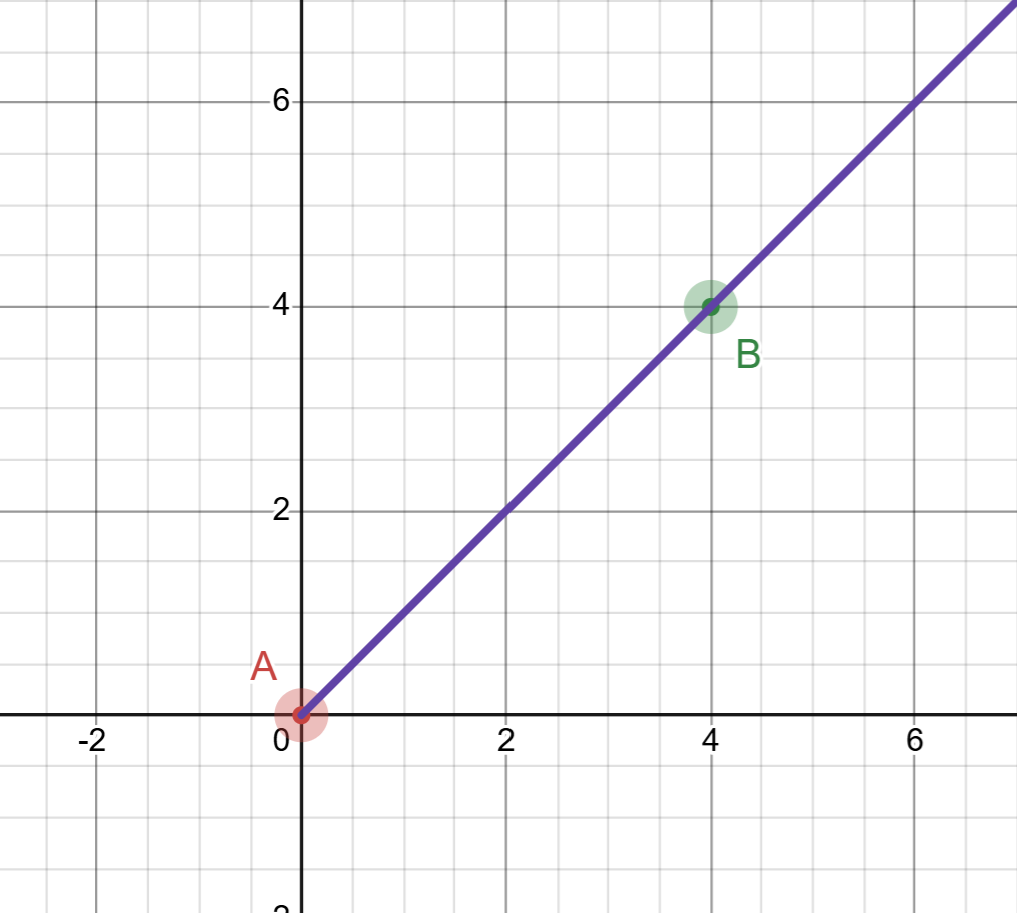
here we can see that the line exceeded the point B or the direction, now this is what we call a ray, but we don’t want to shoot a single ray, we will need to cast/shoot many rays, right? so to do that we need what we call a viewport, let’s go right into it.
What is Viewport??
A viewport is a 2D rectangular virtual window that represents the final image plane through which the camera “sees” the 3D scene. It acts as a canvas or image plane and is usually divided into pixels. Rays are traced from the camera through each pixel on the viewport to determine the final color of the scene.
A viewport is defined by its center point, width and height (aspect ratio), and its distance from the camera. This distance determines the field of view (FOV). If it’s hard to visualize, you can think of the viewport as a plane placed between the camera and the 3D scene.
Earlier, we drew a line from point A to point B and extended it beyond B. In that example, you can think of point B as representing the viewport or image plane. Of course, a viewport is not a single point, but a rectangular area with width and height. This simplification just helps with visualization.
The viewport’s main purpose is to act as a bridge between 3D scene space and 2D image pixels. Rays are cast from the camera through the pixels on this plane to find intersections with 3D objects located beyond it.
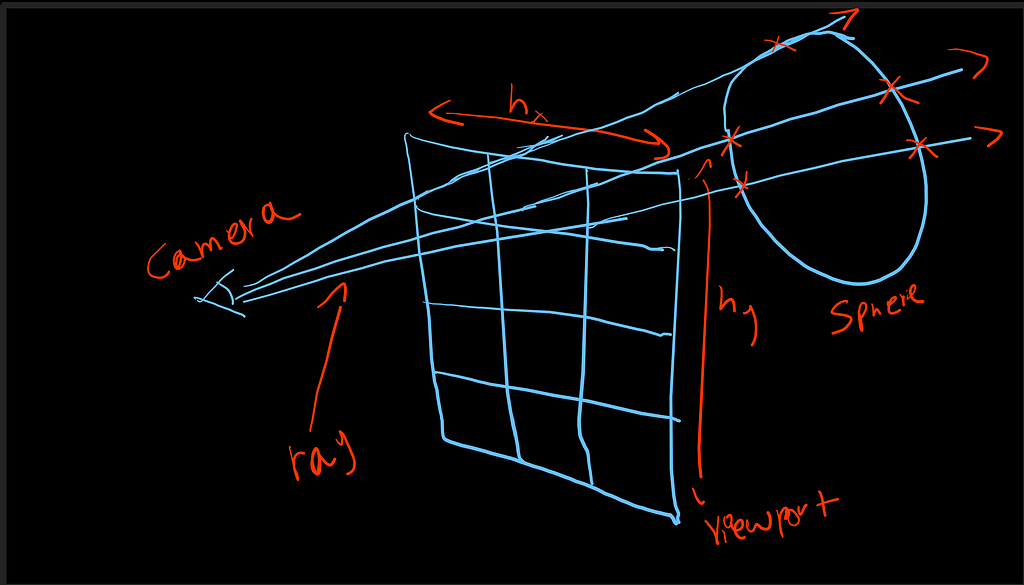
To help you illustrate it take a look at the below image. Let’s “point A” be the camera and all “Point Bs” the viewport, beyond it, is the 3D scene.

As shown in the image above, multiple rays are cast from the camera, or point A, through the viewport in the direction of point B. These rays travel into the 3D scene and intersect with objects along their paths.
For each ray, we check whether it intersects any object in the scene. If an intersection occurs, we compute the exact intersection point and use it to determine the final color of that pixel.
In our case, we will start with spheres, since they are the simplest geometric primitives to work with.
Sphere Equation and Ray Intersection
A sphere can be thought of as a circle extended into 3D space. To simplify the explanation, we’ll first work in 2D using a circle, then extend the same idea to a sphere when we move to implementation. A circle or sphere is defined by two things, it’s center and radius.


where
- x and y are the point on the surface
- r is the distance from the center of the circle to its surface
- Cx is the x component center of the circle
- Cy is the y component center of the circle
This equation represents a circle. It means that any point (x,y)(x, y)(x,y) whose distance from the center equals the radius r lies on the surface of the circle.
To make this easier to work with, let’s simplify the equation.

Or

We can interpret this equation as the length of the vector D from point P to point C, where P lies on the surface of the circle and C is the center of the circle. Subtracting these two points gives us the vector D, and the magnitude of this vector is equal to the radius of the circle.
Going a step further, this expression can also be written as the dot product of vector D with itself, which gives us

Now let’s expand the dot product.

This can be simplified as well.

Do you notice something? It’s similar to the equation of a circle, right? Exactly! That means the dot product of vector ‘D’ behaves just like a circle equation. Now we have a simplified equation that’s much easier to work with.

You might be wondering why we needed to simplify this equation. Well, it’s so we can more easily integrate it with the ray equation. In the simplified version, we have ‘P’, which represents a point on the surface of the circle. So, if we can find a ‘P’ that satisfies this equation, that means we’ve found the circle, right? But how do we actually find ‘P’? If you remember…

This was our ray equation, right? Do you see something here? Yes, we can use the ray equation to find the point ‘P’ that satisfies this condition. That means the circle equation now becomes…

As you can see, we’ve combined the ray equation with the sphere equation. You might be wondering why we need to mix these two. The reason is simple, we want to find the intersection between the ray we cast and the sphere. I hope you’re following so far, so the next step is to simplify the combined equation.
if we separate “td” we get

Now let’s expand the dot product. We get

Let’s subtract r² from both sides. We get

Now, if we take a closer look, the vectors and the radius are known because the radius ‘r’ is constant and the vectors are reduced to scalar values through their dot products. The only unknowns are ‘t’ and ‘t²’, which means this equation is quadratic. This also means we can solve it using the quadratic formula for equations of the form ax² + bx + c = 0.

Now, let’s match our final ray-sphere equation to the familiar quadratic equation.

Using the quadratic formula, we can solve for t. The square root term, known as the discriminant, can be positive, negative, or zero. A positive discriminant means there are two solutions, zero means there is exactly one solution, and a negative value means there is no solution at all. This discriminant tells us whether the ray intersects the sphere, but not where the intersection occurs, since it only indicates the existence of a solution. At this stage, we can already render a basic sphere on the screen. However, to fully utilize the equation, we compute the actual value of t. Once t is known, we substitute it back into the ray equation to obtain the exact intersection point along the ray.
In the next part we will focus on writing code and render our first 3D object.
Building a Ray Tracer from Scratch in C++ Part 1: Mathematical Foundations was originally published in Level Up Coding on Medium, where people are continuing the conversation by highlighting and responding to this story.