Background
In a few previous articles, I shared how to build agents on Microsoft Foundry, connect them with Foundry IQ, and publish them into applications in the M365 ecosystem such as Teams.
In Foundry’s definition, those agents are all prompt agents, which you can also think of as declarative agents. They are fast to build, but the limitation is obvious: the core orchestration and harness capabilities of the agent are not really under your control. For production-grade agents, Foundry offers a better option: hosted agents. In this article, I want to share what I learned while breaking down the actual deployment path for a hosted agent on Foundry.

Deploying Hosted Agents with azd as a Black Box
All of the logic in a hosted agent is implemented by the developer, which means you have full control and can build whatever orchestration and harness capabilities you need. That said, this article is not about the internal implementation of the agent itself. The real focus here is how to deploy a hosted agent.
A hosted agent is still just software running in the cloud, so its deployment strategy is not fundamentally different from other cloud applications.
The official Foundry Agent guidance recommends using Azure Developer CLI (azd) for developing and deploying hosted agents.
Many readers are probably more familiar with another Azure tool, Azure CLI (az). az is more focused on creating and managing Azure resources directly. It gives you a lower-level, resource-oriented command-line experience.
By contrast, azd is more developer-friendly and is designed to improve application development workflows on Azure. It provides templates around common development patterns so that developers can move faster.
A typical azd template usually includes the following components:
- The infra directory: contains all infrastructure-as-code resource definitions, typically in either Bicep or Terraform.
- The src directory: contains starter application code that you can extend based on your own needs.
- azure.yaml: a configuration file that maps source directories in the project to Azure resources. For example, if the src directory contains both an API service and a front-end application, azure.yaml describes how they map to Azure resources.
- The .azure directory: stores environment variables, Azure subscription details, and related settings.
- The .github directory: contains GitHub Actions workflows for CI/CD.
To support hosted agent development and deployment on Foundry, azd provides an extension:
azd extension install azure.ai.agents
With this extension installed, you can initialize a Foundry Agent project very easily:
azd ai agent init -m <agent-definition-url>
According to the official documentation, once you have this starter template, you can deploy the hosted agent with azd up. You do not even need to understand what happens behind the scenes. You can treat it as a pure black box.
However, based on my own experiments and testing, the current azd agent template still has some issues that can lead to deployment failures. At that point, the black-box nature of azd becomes the real problem, because if you do not understand how it works internally, it is very hard to troubleshoot or fix anything.
Of course, at the time I am writing this article, on May 5, 2026, hosted agents are still in preview, so deployment failures are not entirely surprising.
That is why, in the second half of this article, I will set azd aside and start from scratch. I will use only basic Azure command-line tools plus a few manual steps in Azure Portal to complete the deployment of a hosted agent. Let's break open the black box and see what is really happening.
Deploying a Hosted Agent from Scratch
From a technical point of view, a hosted agent follows a cloud-native container deployment model. If we think along that line, the full deployment process can be broken into the following steps:
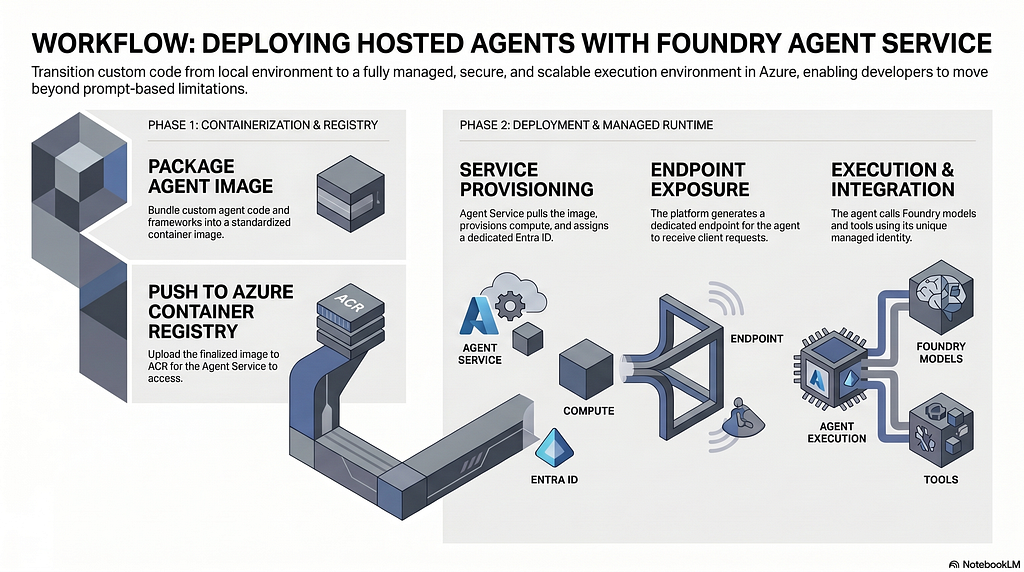
- Create an Azure Container Registry resource to store and manage the Docker image for the agent.
- Build the Docker image in the cloud so you do not need Docker installed locally.
- Create a Foundry Project resource, because the hosted agent runs on top of a Foundry Project.
- Configure RBAC permissions for the Foundry Project, because the hosted agent needs to pull the image before it can start.
- Create the hosted agent through the Azure SDK. Each hosted agent receives an Agent ID, which is essentially an Entra identity inside the Foundry Agent service.
- Configure RBAC permissions for the Agent ID.
To summarize the whole workflow in one sentence: infrastructure first, agent second.
Create an Azure Container Registry Resource
First, create an Azure Container Registry named debugagent:

Build the Docker Image in the Cloud
Because the focus of this article is to break down the deployment path of a hosted agent, I keep the agent implementation itself as simple as possible. This agent is built with Microsoft Agent Framework and uses a model deployed in Foundry to answer questions.
As you can see, the agent reads its configuration from environment variables. In the following steps, we will see how to provide those variables at container runtime.
import os
from azure.identity.aio import DefaultAzureCredential
from dotenv import load_dotenv
from agent_framework.azure import AzureAIClient
from azure.ai.agentserver.agentframework import from_agent_framework
load_dotenv(override=False)
async def main():
    credential = DefaultAzureCredential()
    async with AzureAIClient(
        project_endpoint=os.getenv("AZURE_AI_PROJECT_ENDPOINT"),
        model_deployment_name=os.getenv("AZURE_OPENAI_CHAT_DEPLOYMENT_NAME"),
        credential=credential,
    ).as_agent(
        name="Assistant",
        instructions="You are a helpful assistant. Answer questions concisely and accurately.",
    ) as agent:
        await from_agent_framework(agent).run_async()
if __name__ == "__main__":
    import asyncio
    asyncio.run(main())
The corresponding Dockerfile looks like this:
FROM python:3.12-slim
WORKDIR /app
COPY . user_agent/
WORKDIR /app/user_agent
RUN if [ -f requirements.txt ]; then \
        pip install -r requirements.txt; \
    else \
        echo "No requirements.txt found"; \
    fi
EXPOSE 8088
CMD ["python", "main.py"]
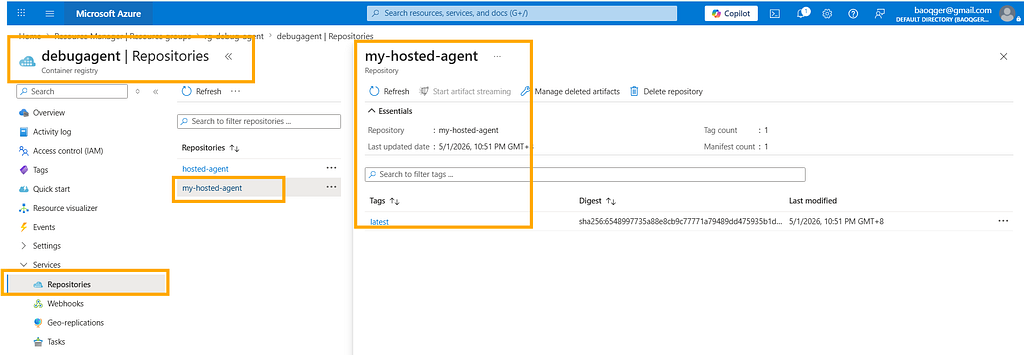
With these source files in place, we can use az acr build to build the Docker image directly in the cloud:
$acrName = "debugagent"
az acr build --registry $acrName --image my-hosted-agent:latest --platform linux/amd64 `
    --file ./src/debug-agent/Dockerfile `
    ./src/debug-agent
This gives us an image named my-hosted-agent:
Create a Foundry Project Resource
Create a Foundry Project, and deploy a gpt-4.1 model inside it:


Configure RBAC for the Foundry Project
Since the runtime is container-based, the Foundry Project needs permission to pull the image from Azure Container Registry. To do that, go to the Azure Container Registry resource and assign either Container Registry Repository Reader or AcrPull to the managed identity of the Foundry Project, as shown below:

Create the Hosted Agent
We can create a hosted agent through the Azure SDK azure.ai.projects. The script is shown below:
import os
from dotenv import load_dotenv
from azure.identity import DefaultAzureCredential, get_bearer_token_provider
from azure.ai.projects import AIProjectClient
from azure.ai.projects.models import HostedAgentDefinition, ProtocolVersionRecord, AgentProtocol
load_dotenv(override=True)
credential = DefaultAzureCredential()
bearer_token_provider = get_bearer_token_provider(
    credential, "https://management.azure.com/.default"
)
FOUNDRY_ENDPOINT = os.environ["FOUNDRY_PROJECT_ENDPOINT"]
MODEL_DEPLOYMENT = os.environ.get("FOUNDRY_MODEL_DEPLOYMENT_NAME")
print(f"Using Foundry endpoint: {FOUNDRY_ENDPOINT}")
print(f"Using model deployment: {MODEL_DEPLOYMENT}")
project_client = AIProjectClient(
    endpoint=FOUNDRY_ENDPOINT, credential=credential, allow_preview=True
)
agent = project_client.agents.create_version(
    agent_name="my-hosted-agent",
    definition=HostedAgentDefinition(
        kind="hosted",
        container_protocol_versions=[
            ProtocolVersionRecord(protocol=AgentProtocol.RESPONSES, version="1.0.0")
        ],
        cpu="0.25",
        memory="0.5Gi",
        image="debugagent.azurecr.io/my-hosted-agent:latest",
        environment_variables={
            "AZURE_AI_PROJECT_ENDPOINT": FOUNDRY_ENDPOINT,
            "AZURE_OPENAI_CHAT_DEPLOYMENT_NAME": MODEL_DEPLOYMENT,
        }
    )
)
print(f"Agent created: {agent.name}, version: {agent.version}")
There are a few key points in this script:
- The hosted agent is named my-hosted-agent.
- The hosted agent is bound to the Docker image we just built: debugagent.azurecr.io/my-hosted-agent:latest.
- The script defines the required runtime compute resources: CPU and memory.
- It also sets environment variables for the Foundry Project endpoint and the deployed model name, which matches the way the agent code reads its configuration from environment variables.
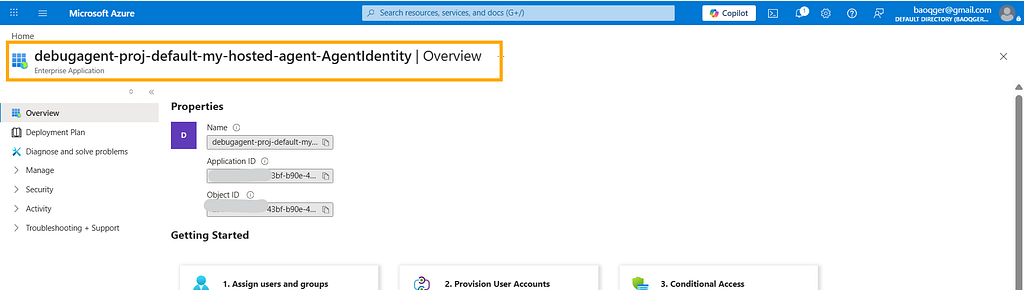
After creation, the hosted agent receives a special Entra ID that serves as its Agent ID:
Configure RBAC for the Agent ID
This Agent ID represents the newly created hosted agent. It also needs the correct permissions in order to access models and other resources in Foundry.
So at the scope of the Foundry Project, assign either Azure AI User or Azure AI Project Manager to that Agent ID, as shown below:
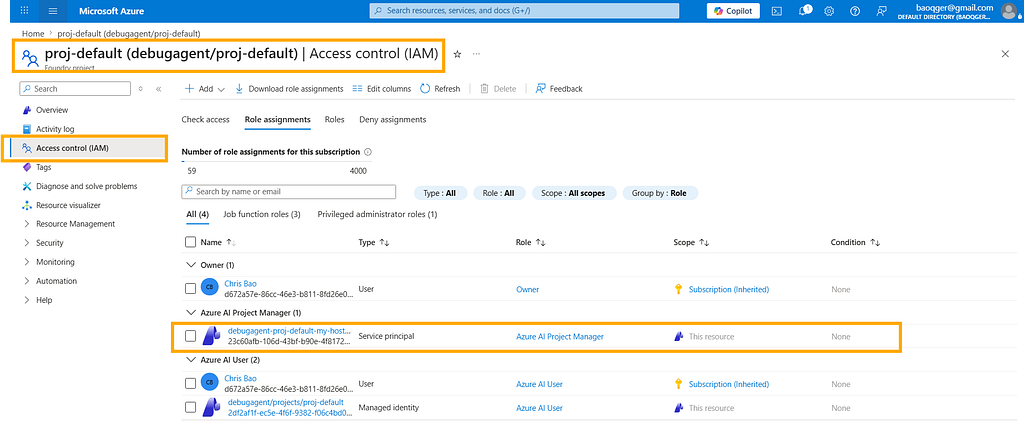
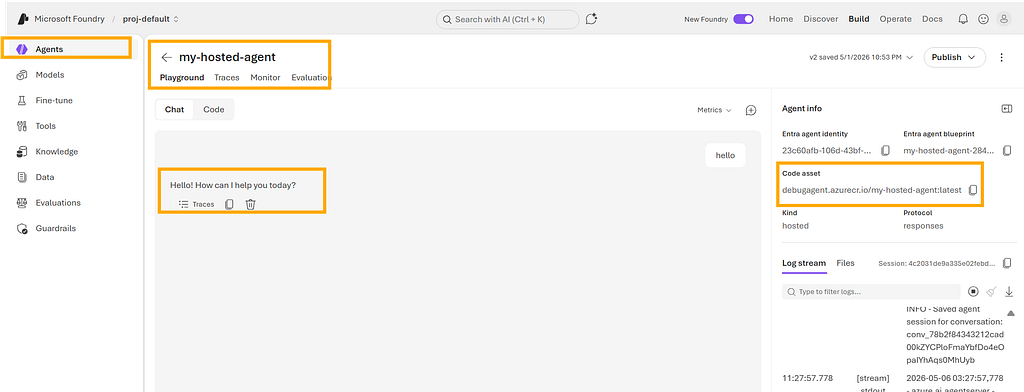
Once all of these steps are done, we end up with a working hosted agent:
I am Chris Bao, a Microsoft Certified Trainer focused on the Azure AI platform. I specialize in Azure AI services and Agent development, and I provide training and consulting for both enterprises and individual learners.
For collaboration, please contact: [email protected]
Breaking Open the Black Box — The Real Deployment Path for Microsoft Foundry Hosted Agents was originally published in Level Up Coding on Medium, where people are continuing the conversation by highlighting and responding to this story.